Download the Windows executable from the DEKXDIS releases page. Save DEKXDIS.exe in the folder you want to keep it in, then double-click it to open the app. You can also build it from source.
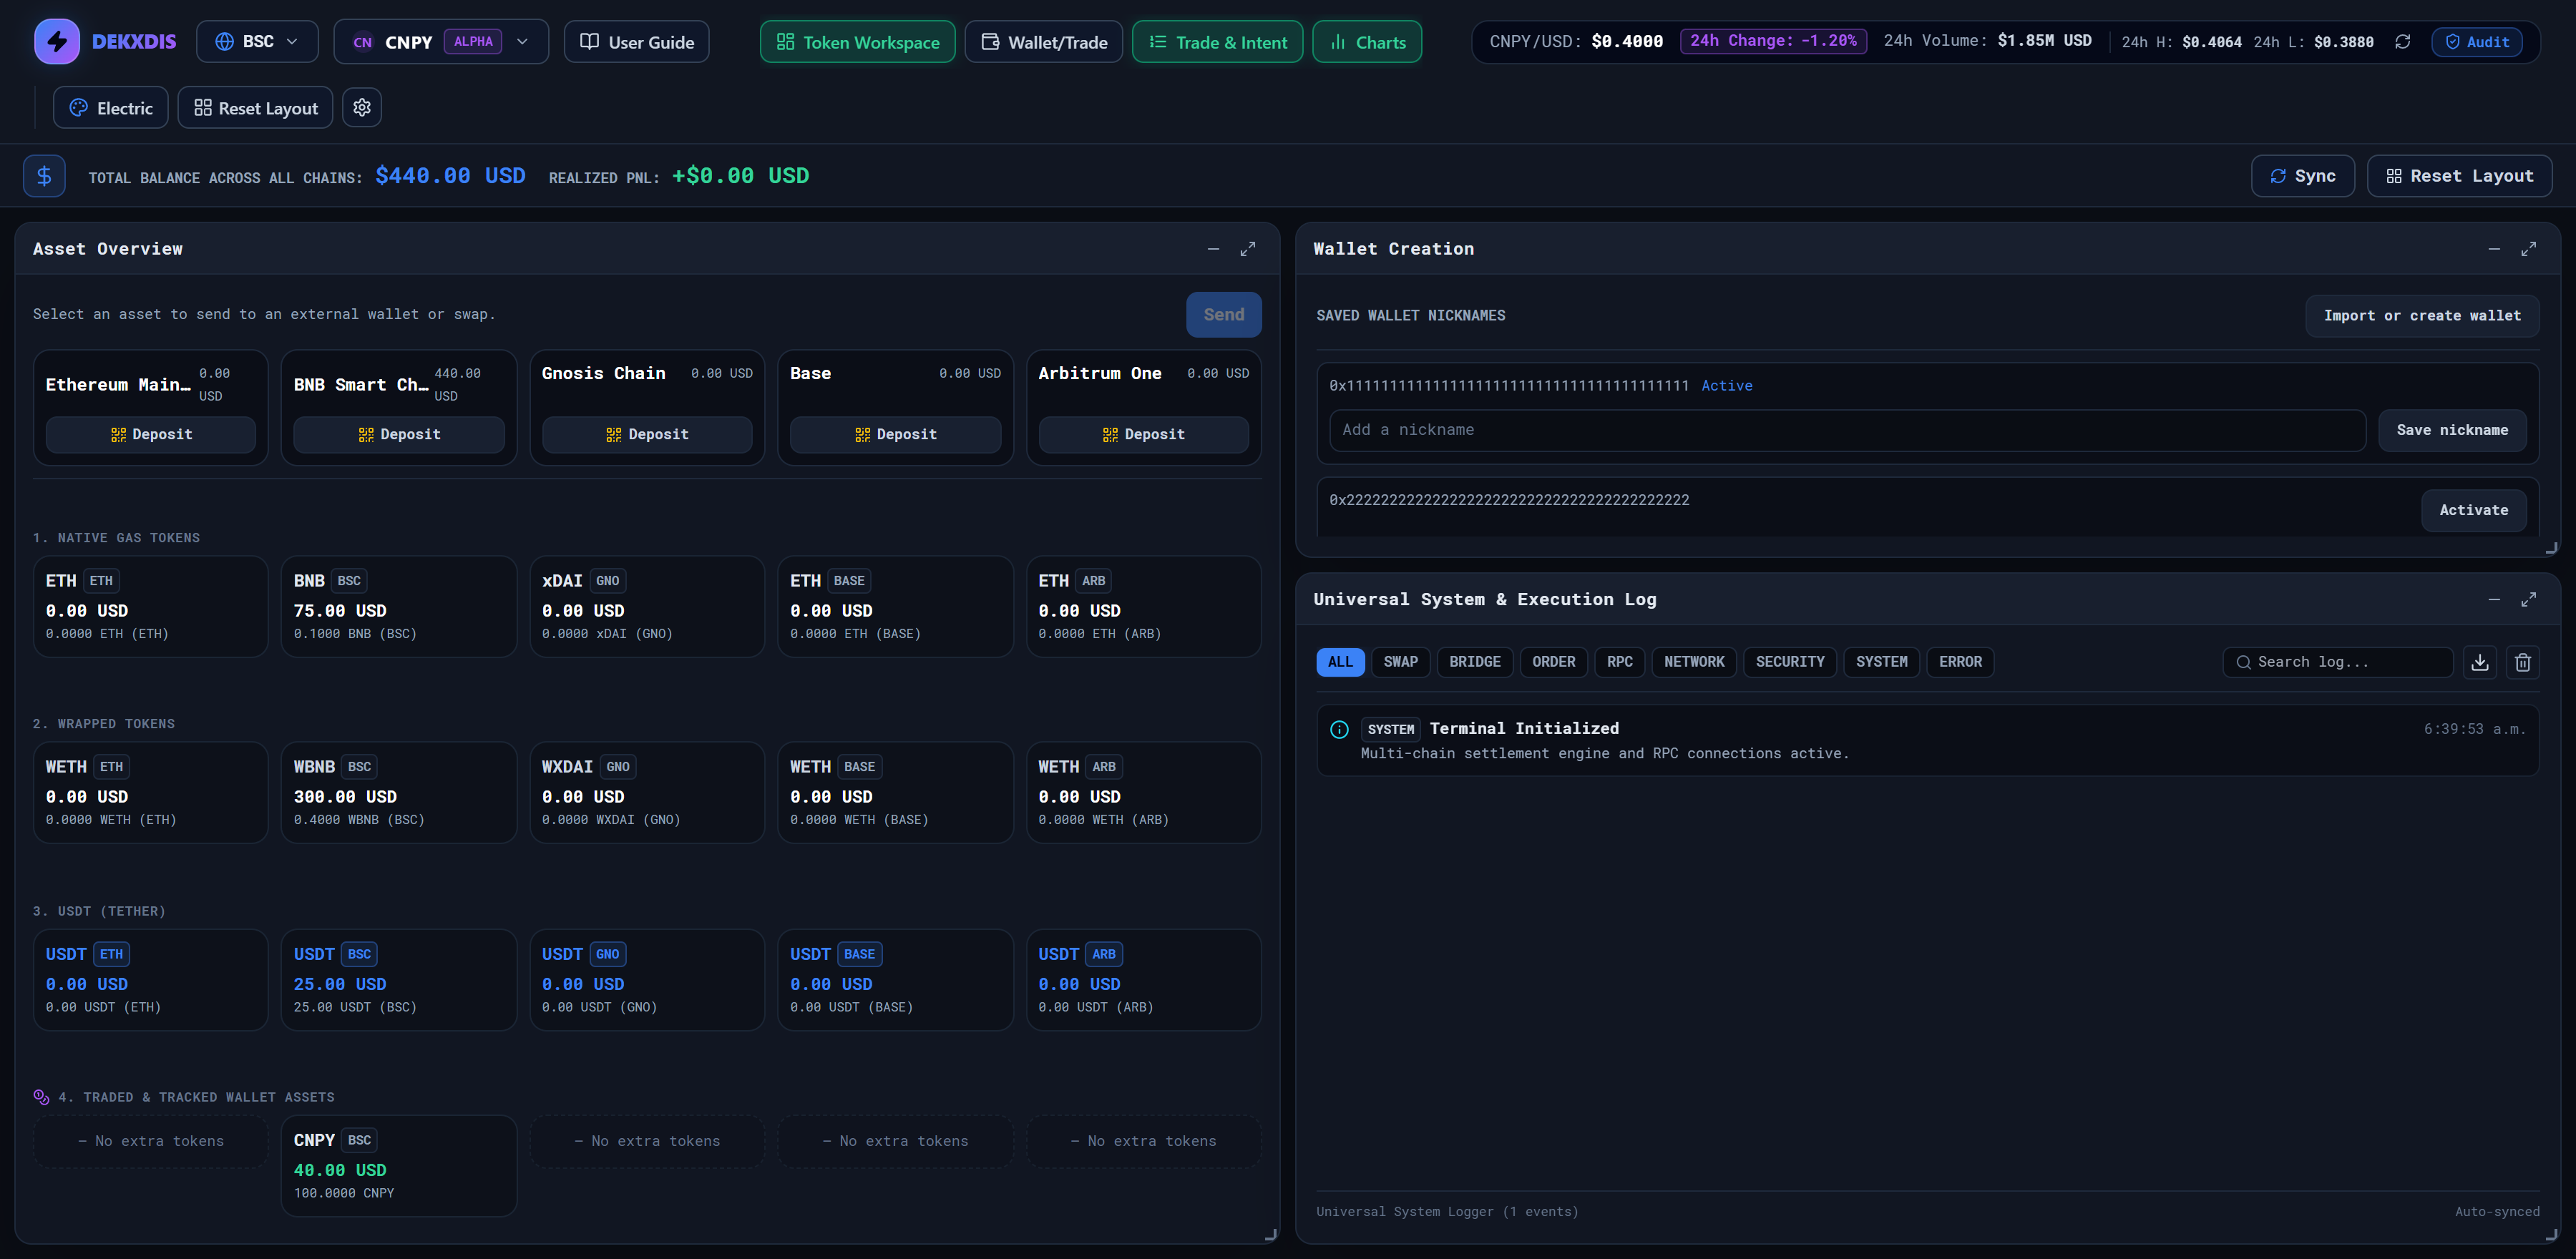
Select Overview in the top bar. This page contains your assets across the supported networks, saved wallets, and the System Log. Token Workspace takes you back to the chart.
Overview: assets on the left; saved wallets and the System Log on the right. Example balances.
Step 2
Create or import your wallet
In Overview, find Wallet Creation and select Import or create wallet.
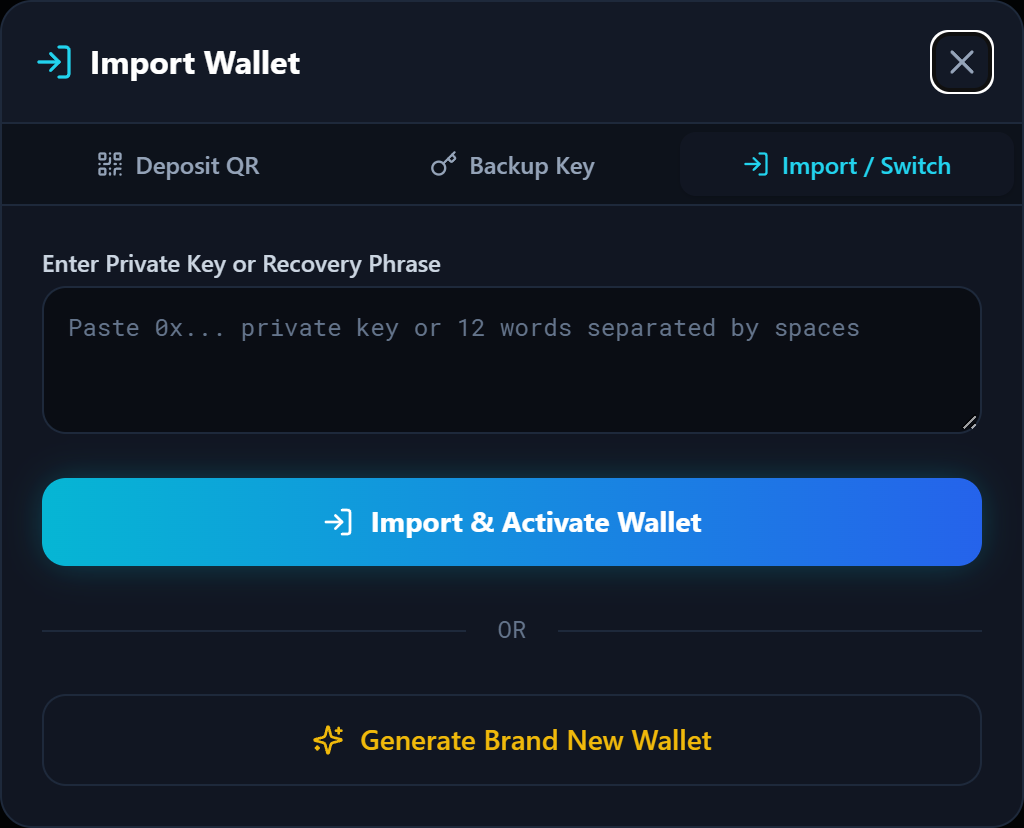
For a new wallet: choose Generate Brand New Wallet.
For an existing wallet: enter its private key or recovery phrase, then select Import & Activate Wallet.
DEKXDIS keeps the wallet on your computer, protected by your Windows account. The active wallet is used for deposits, trades, and transfers.
If a wallet is already active, you can continue to the next step.
Overview → Wallet Creation → Import or create wallet.
Step 3
Back up your wallet
A new wallet opens the backup window automatically.
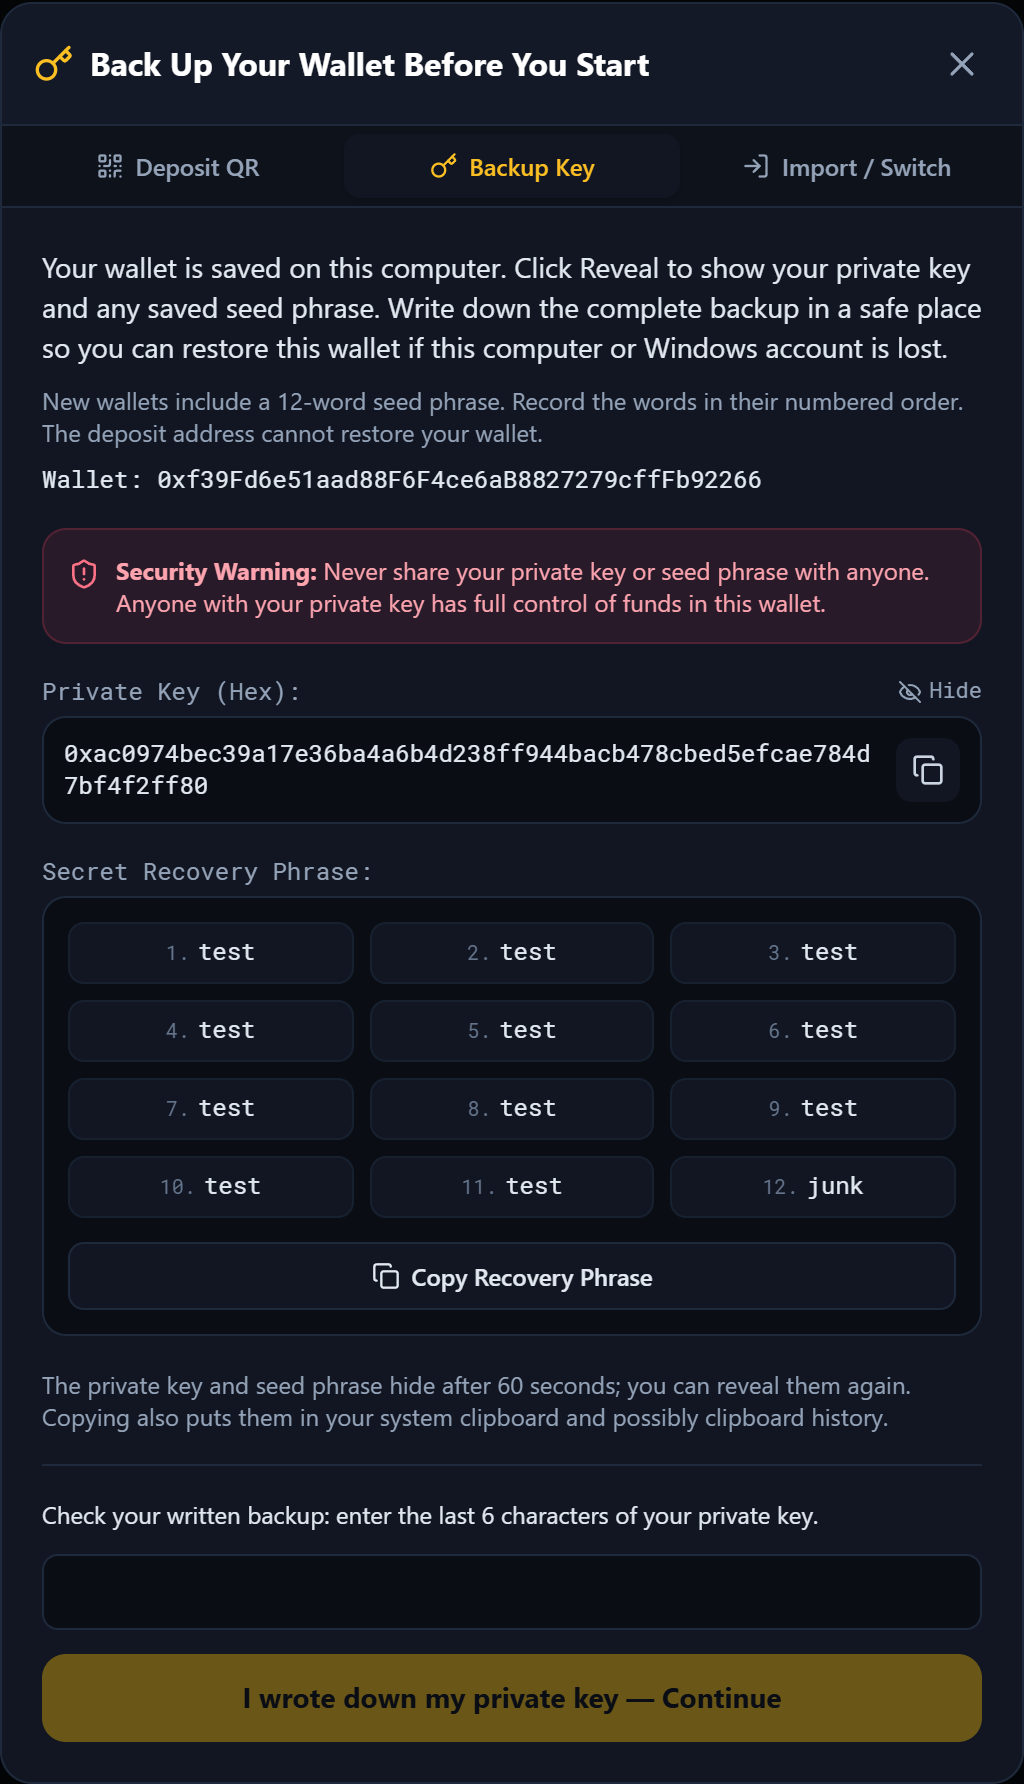
Select Reveal beside Private Key.
Write down the complete private key and the 12-word recovery phrase, keeping the words in their numbered order. The copy buttons are available beside the key and below the phrase.
Enter the last six characters of your private key in the backup check, then select I wrote down my private key — Continue.
Store your backup privately. Either the private key or recovery phrase can restore the wallet; the deposit address cannot.
To view the backup again later, open Wallet/Trade and select the key icon (Backup Key / Seed Phrase). Imported wallets show a recovery phrase only if one was saved with that wallet.
The image shows a public test wallet. Use the backup from your own wallet.
The full backup window after Reveal. Public test data is shown.
Step 4
Add funds
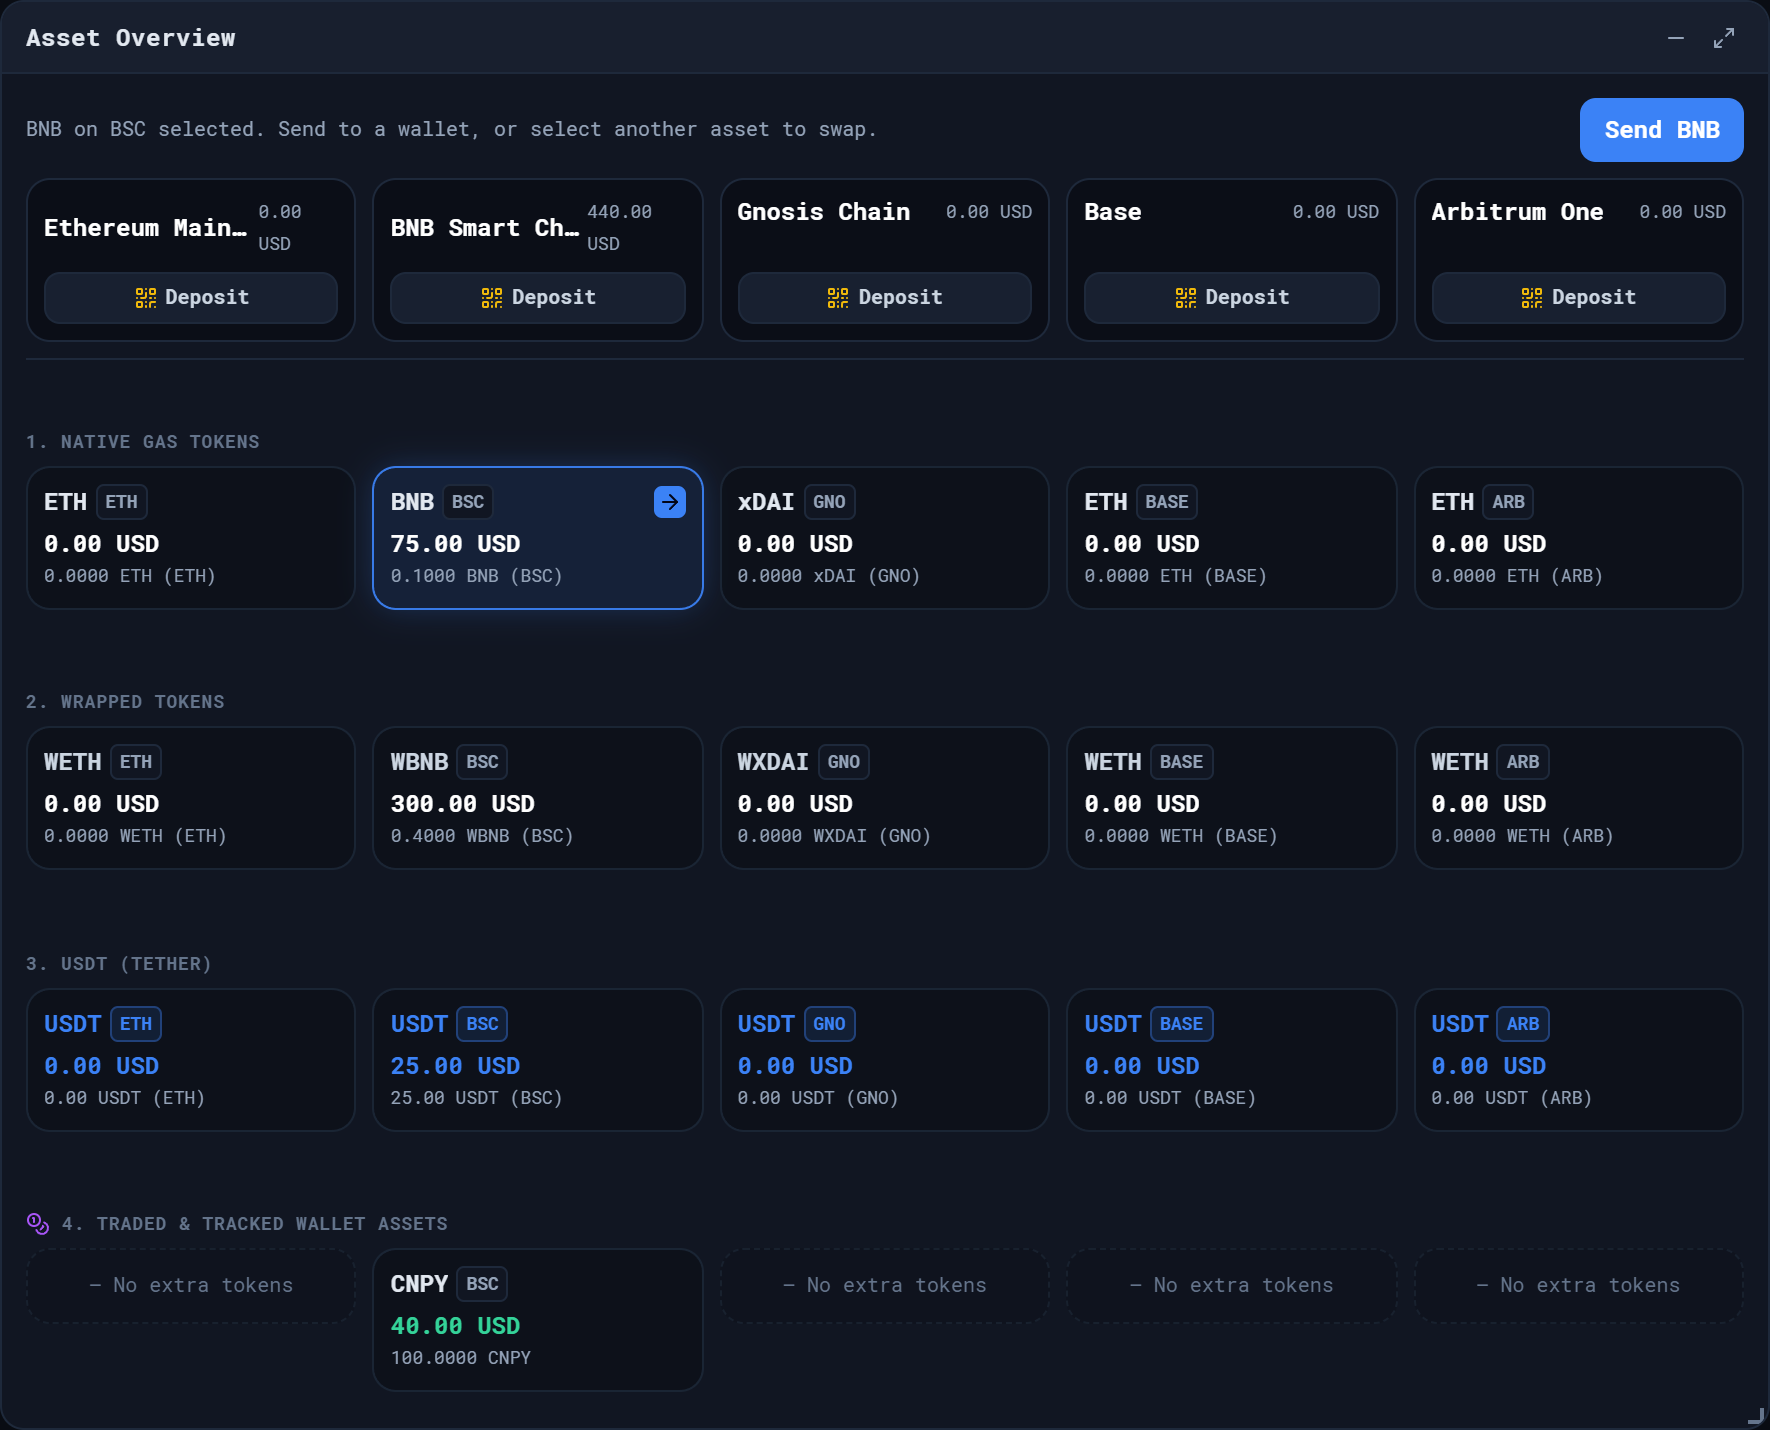
In Asset Overview, select Deposit under the network you want to use. The deposit window shows that network’s name, your wallet address, and a QR code.
Copy the address, or scan the QR code from your sending wallet.
In your wallet or exchange, choose the same withdrawal network. For example, to fund BNB Smart Chain, convert to BNB first and send it using BNB Smart Chain (BSC).
Send a small test amount. Once it appears in DEKXDIS, transfer the amount you want to use. Select Sync on Overview to refresh the balances.
Use the matching network: BNB Smart Chain, Ethereum, Arbitrum, Base, or Gnosis. Do not transfer to this wallet using the Bitcoin (BTC) or Solana (SOL) network.
The network’s Deposit button is above its assets. The selected BNB tile is highlighted.
Step 5
Prepare funds for trading
DEKXDIS swaps the network’s wrapped native token for the token you are trading. This applies to both manual trades and automation.
In Asset Overview, select the native token you want to wrap. Its tile becomes highlighted.
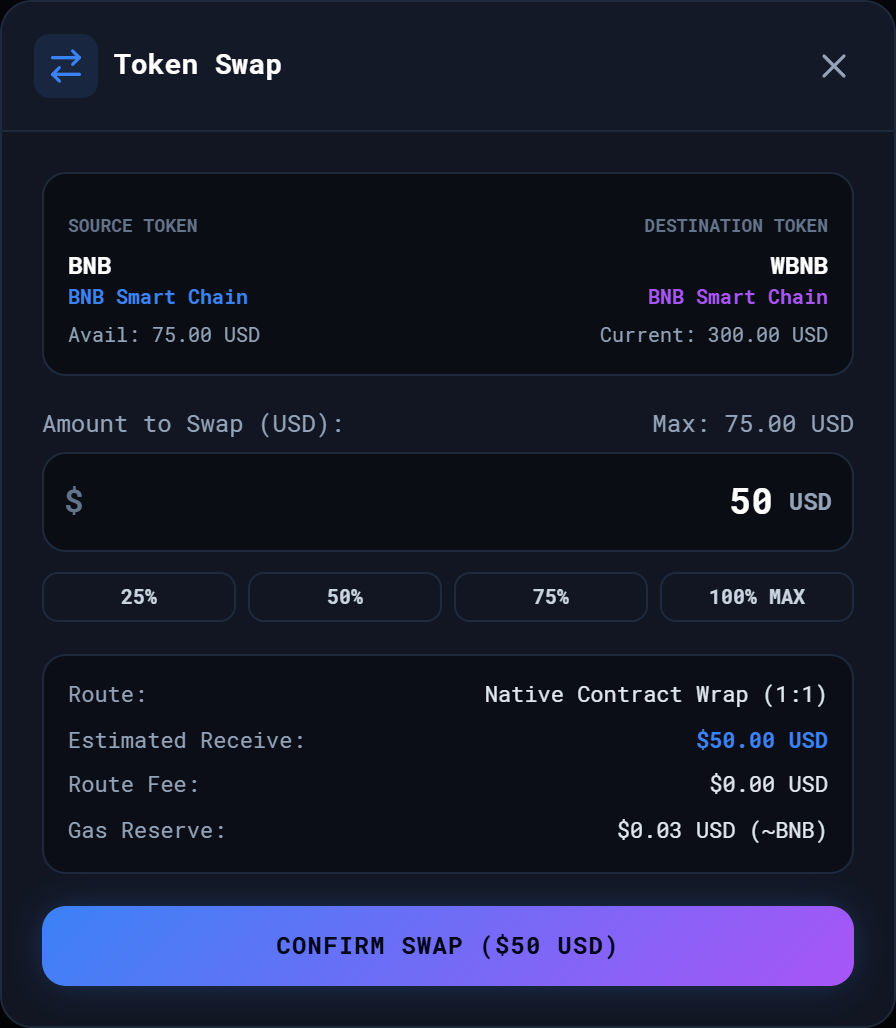
Select the wrapped token directly below it on the same network. That tile is also highlighted, and Token Swap opens.
Enter the amount in USD, or use a percentage button. Review the source, destination, and estimated amount to receive.
Select Confirm Swap. The updated wrapped balance is available for trading.
On BSC, select BNB, then WBNB. For ETH, use WETH; for xDAI, use WXDAI. Wrapping converts the native token to its wrapped form at a 1:1 token ratio.
You can reverse the selection to unwrap. The Wrap and Unwrap buttons in Wallet/Trade also open the native-token conversion controls.
The complete Token Swap window, from its title to Confirm Swap.
Step 6
Choose the token to trade
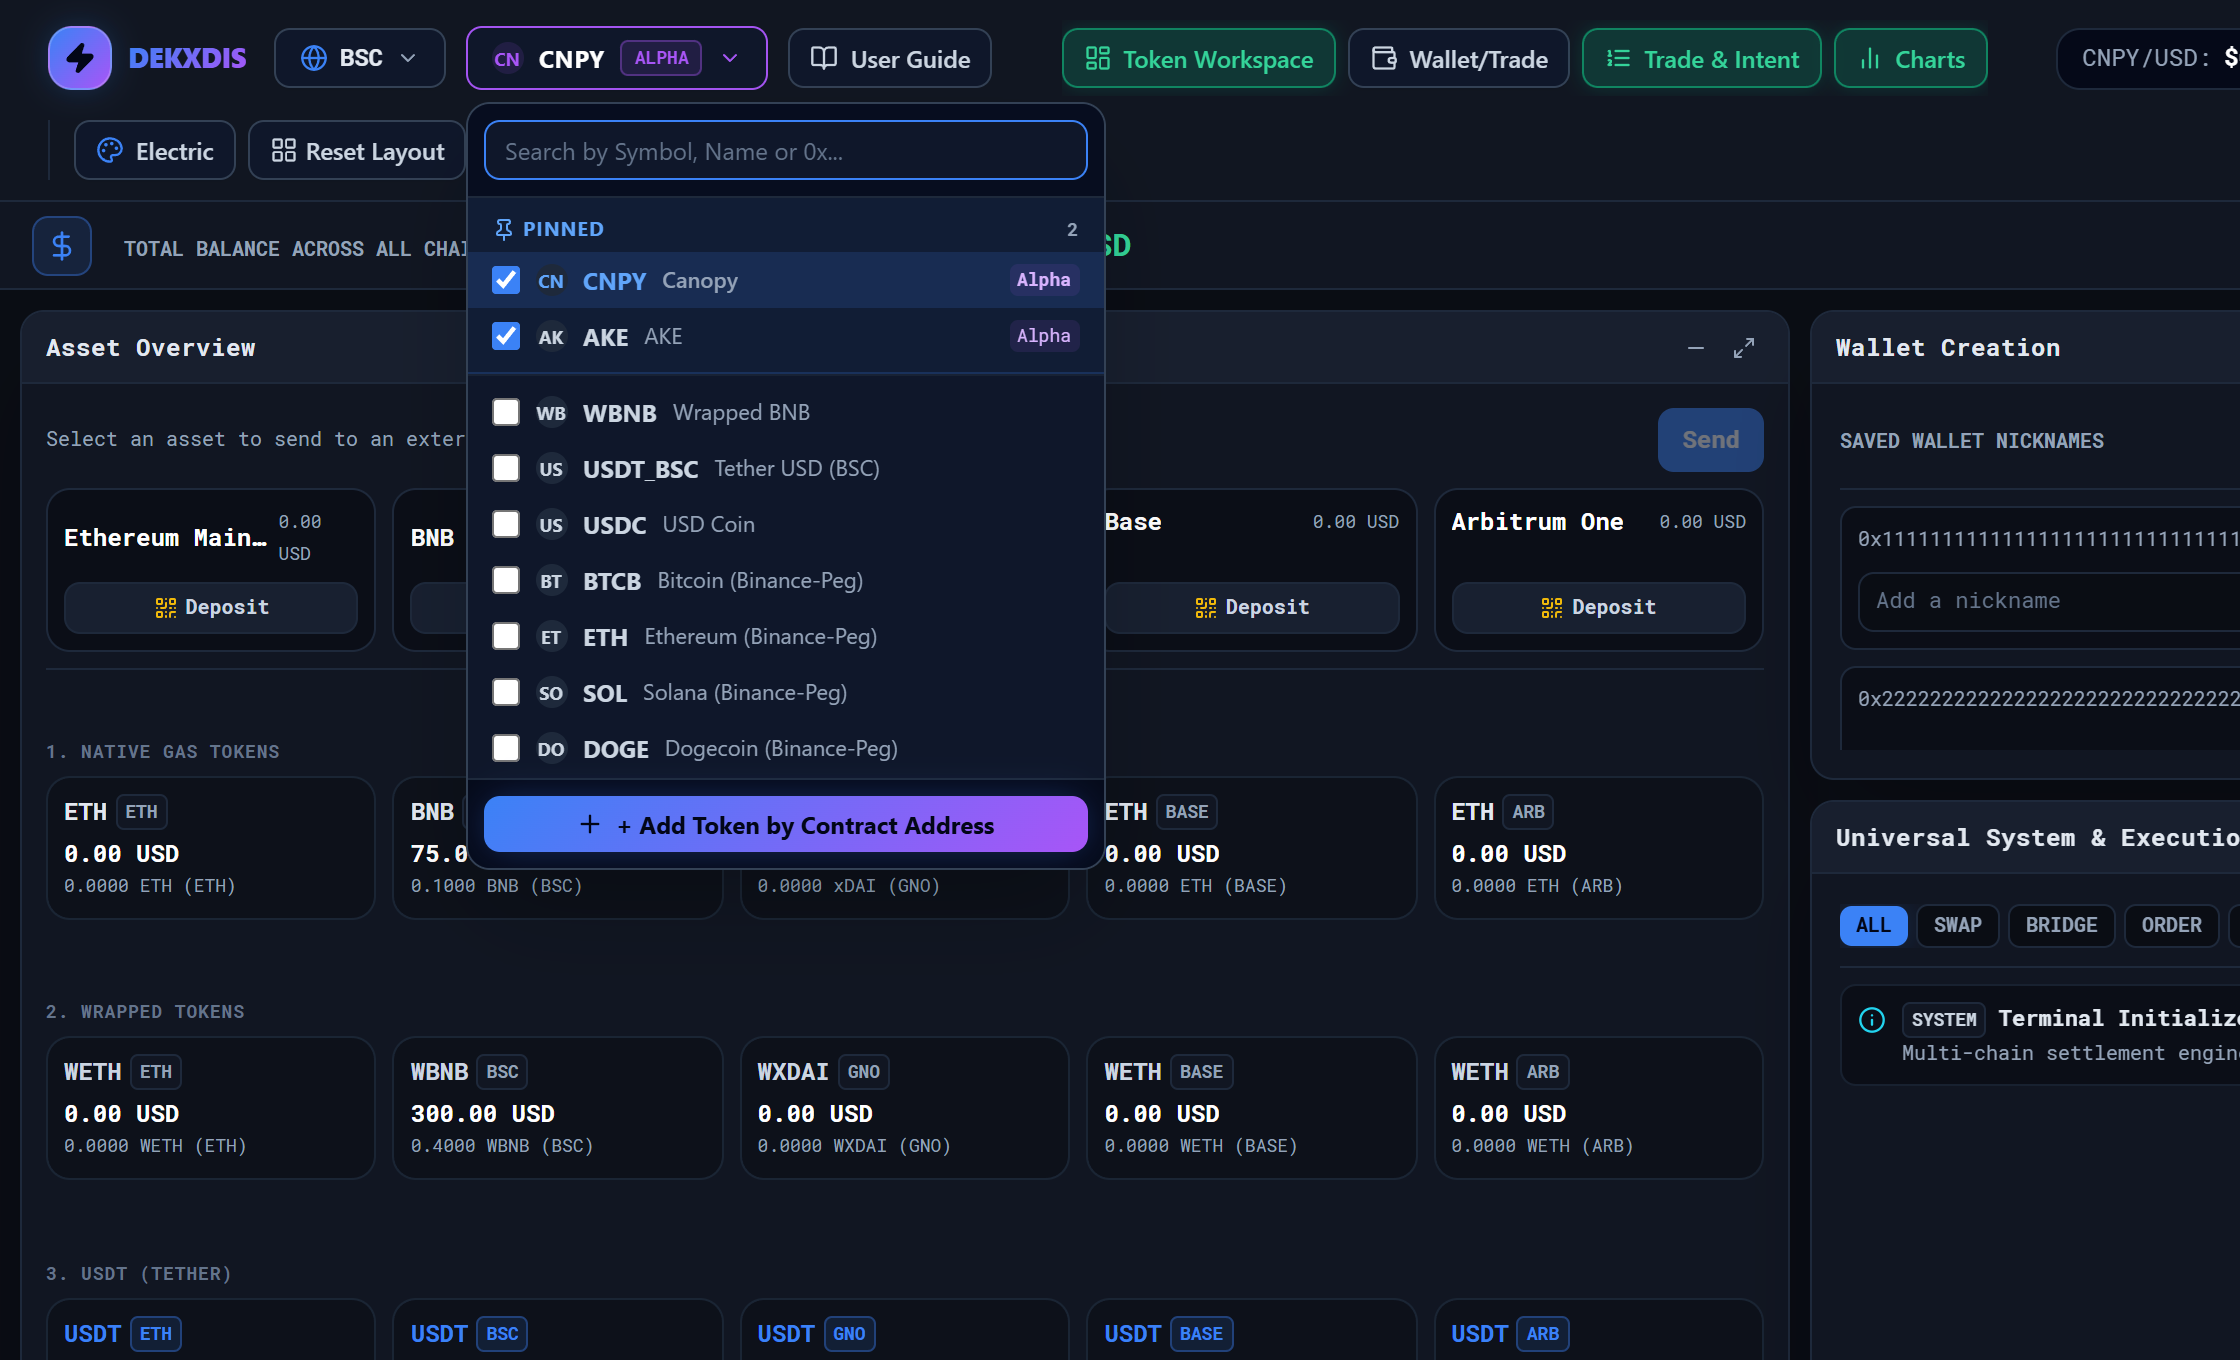
Select the network in the top bar, then open the token button beside it. Search by symbol, name, or contract address, and select a token to load its workspace. If you are on Overview, select Token Workspace to open the chart.
The checkboxes pin tokens to the top of the list. Alpha identifies tokens from the Alpha list. To add a token that is not listed, select + Add Token by Contract Address, confirm the network, paste the contract address, and select Inspect. Review the token details, then select Import & Set Active.
The token button stays visible above its open menu. The checkboxes pin tokens; selecting a name chooses the token to trade.
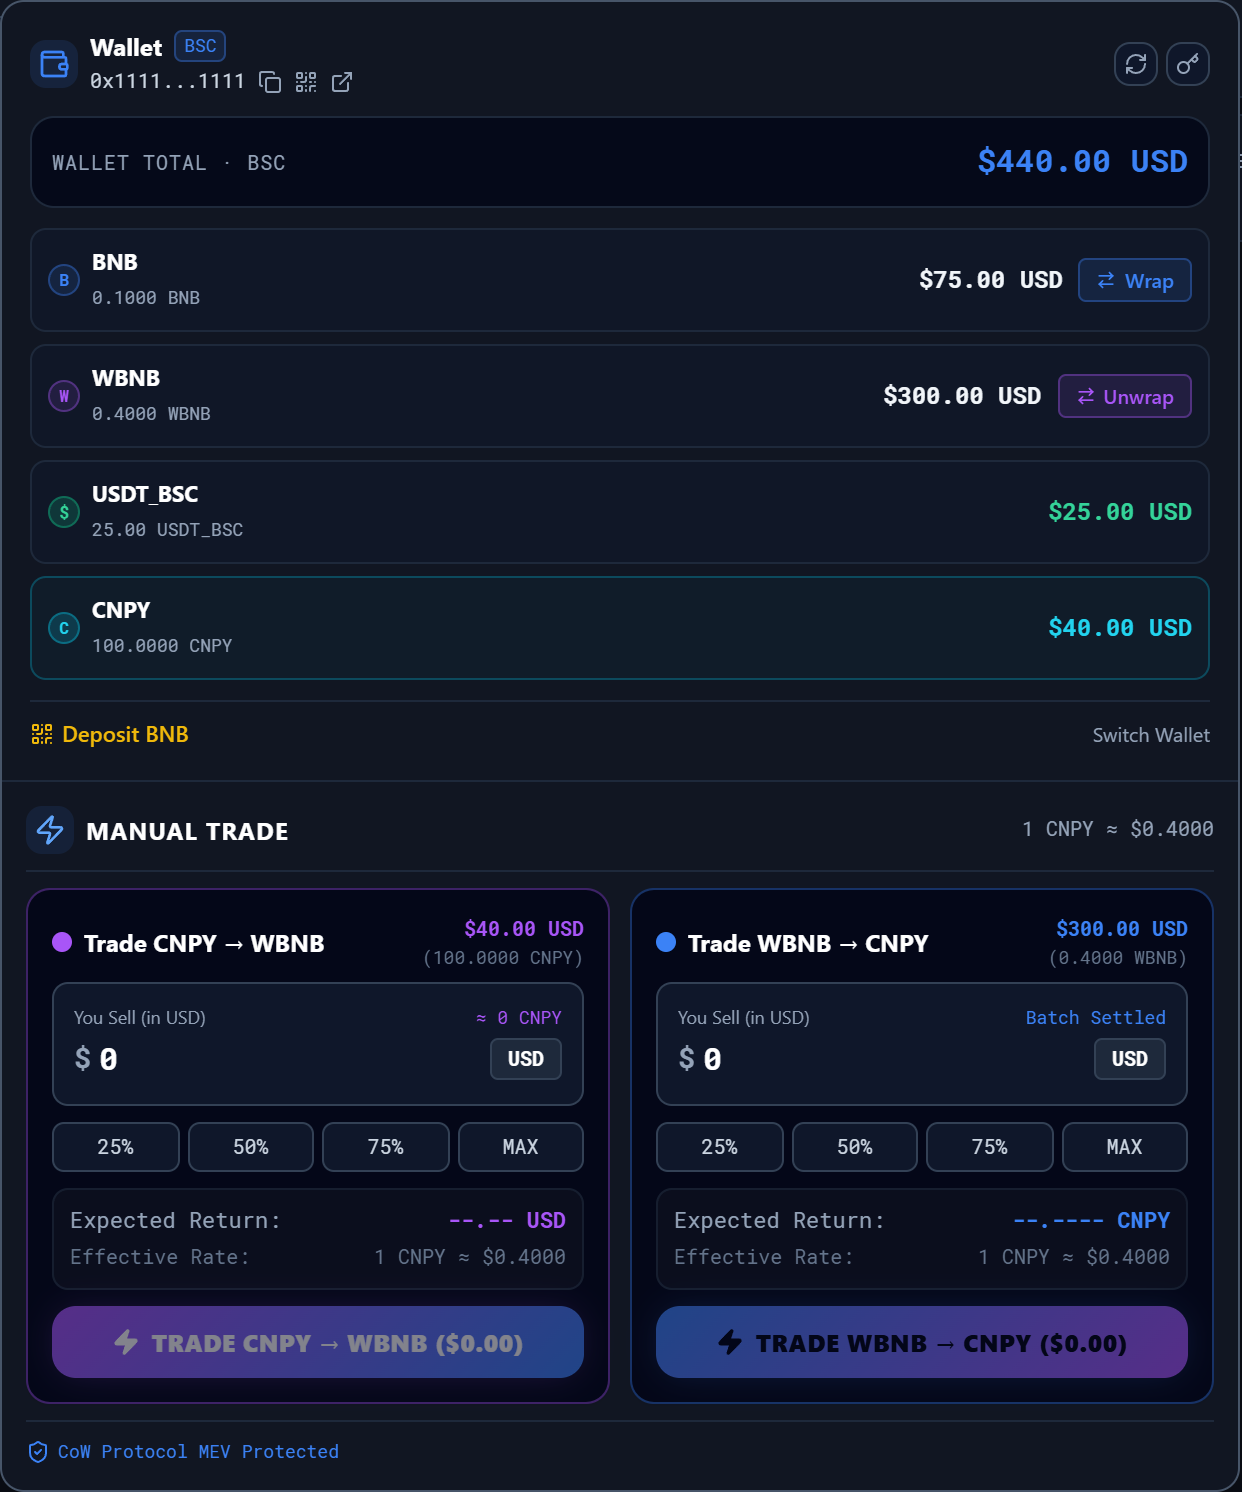
Select Wallet/Trade in the top bar. Your wallet balances and manual trading controls open together.
Use the Sell side to sell the selected token, or the Buy side to buy it with the network’s wrapped native token.
Enter an amount in USD. The form shows the corresponding token quantity. The percentage buttons use a share of the available balance; MAX selects the available budget.
Select the buy or sell button to submit the trade. Follow it in Order History.
Last $… recalls the previous amount used on that side.
The wallet controls above the form include Deposit, Switch Wallet, Wrap, and Unwrap. The key icon opens your backup, and the refresh icon updates your balances. The copy button copies your wallet address; the explorer link opens its on-chain activity.
Select Wallet/Trade again, click outside the menu, or press Escape to close it.
Wallet and Manual Trade remain together in one menu. Example balances.
03 / Chart trading
Place and manage orders
Use the chart
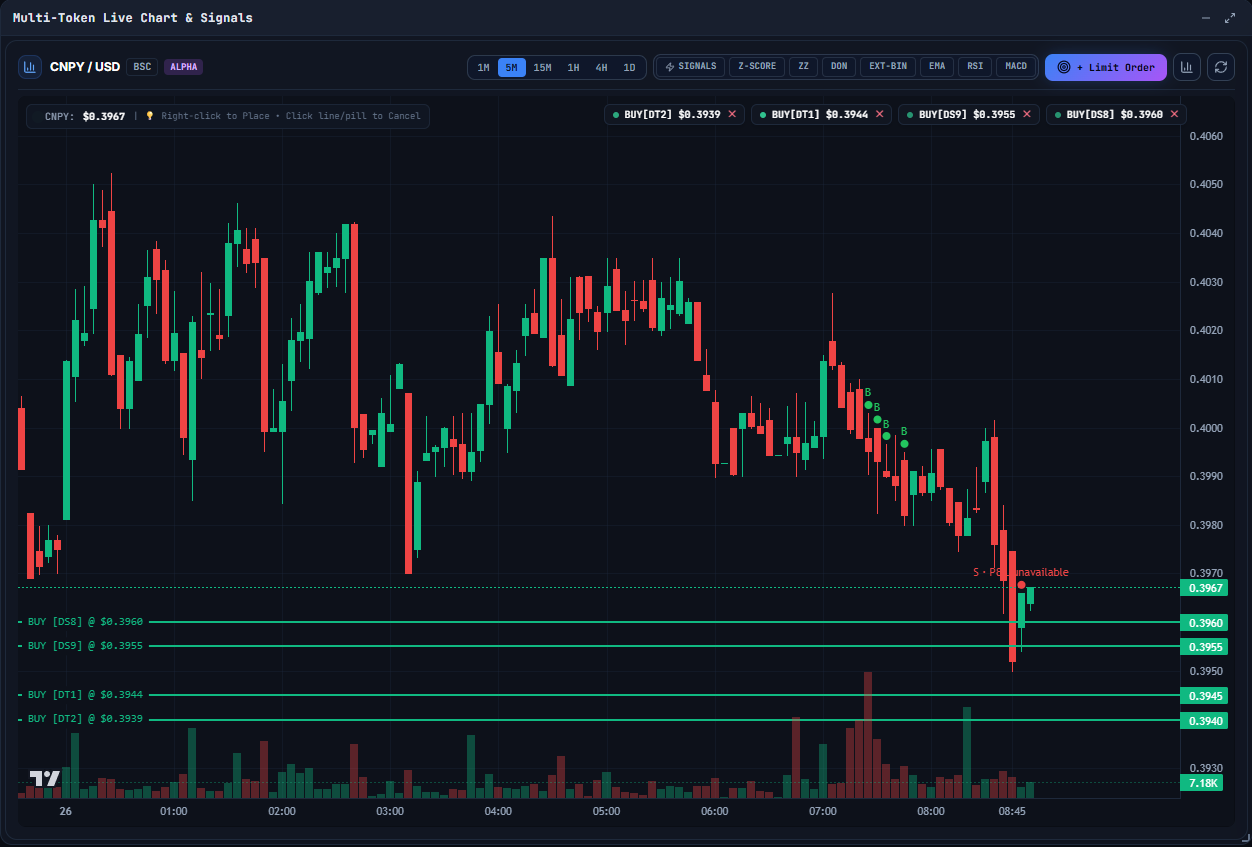
Choose a timeframe from 1M, 5M, 15M, 1H, 4H, or 1D. Drag the chart to move through time and use the mouse wheel to zoom. The indicators above the chart toggle their overlays: Z-SCORE, ZZ, DON, EXT-BIN, EMA, RSI, and MACD. Signals shows or hides the signal markers. Reset Zoom fits all loaded candles into view; the refresh button reloads the candles.
The price strip in the top bar shows the current price, 24-hour change, volume, high, and low.
The chart toolbar, price scale, and order lines are shown together.
Set a limit price
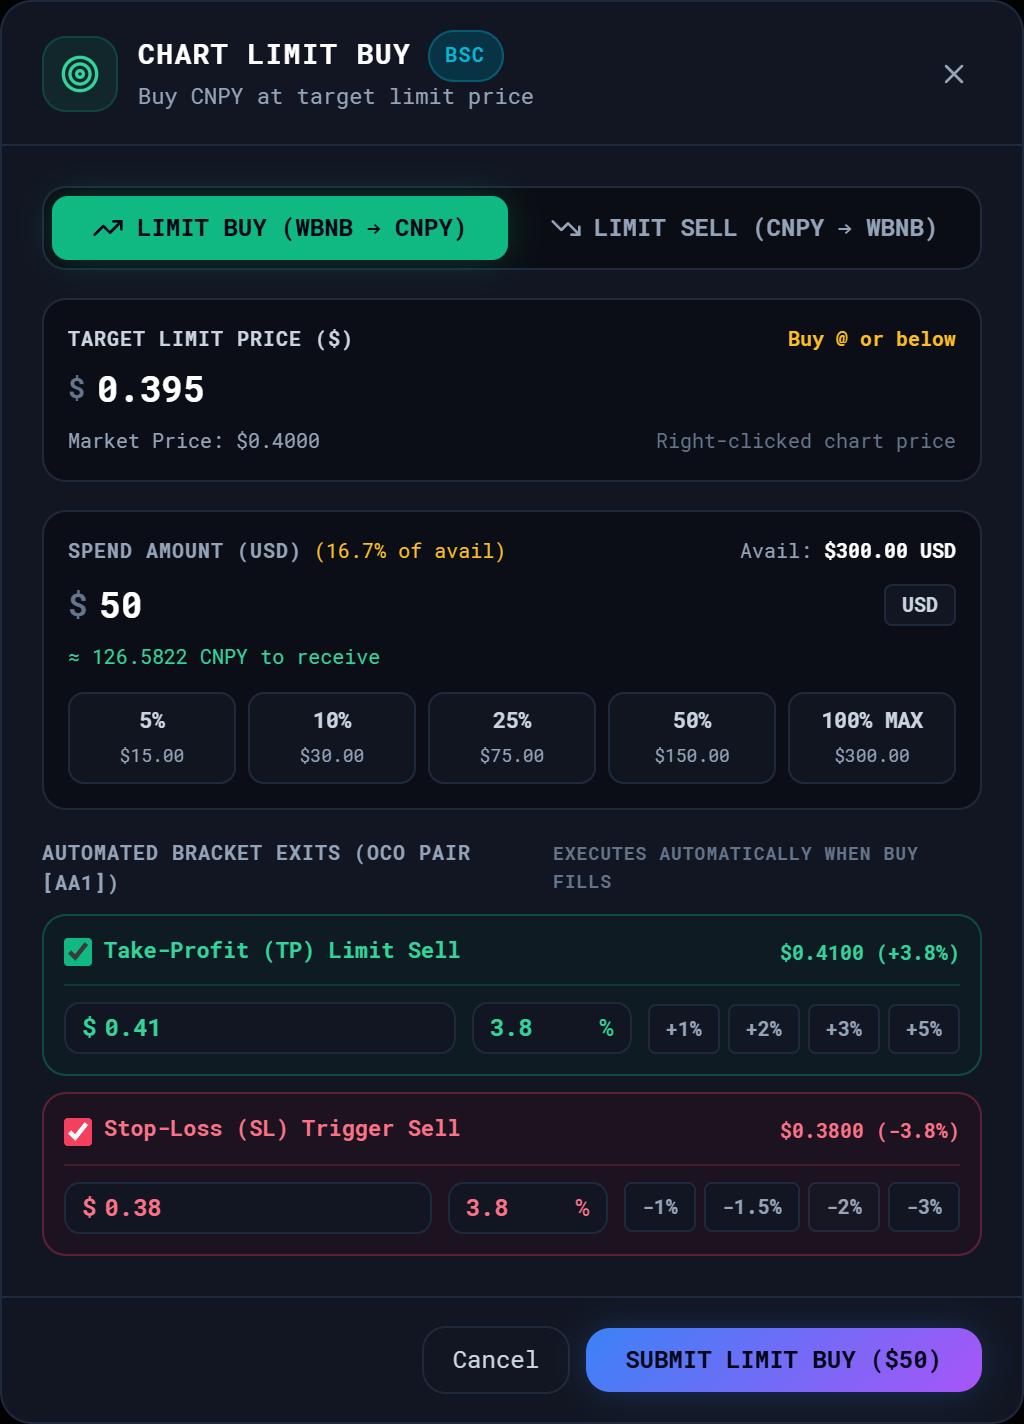
Right-click the price you want on the chart, or select + Limit Order.
Choose Limit Buy or Limit Sell. The chart price is filled in when you opened the form with a right-click.
Enter your amount in USD, or choose a percentage of the available balance. Review the token quantity and target price.
For a buy, add a take-profit price, a stop-loss price, or both if you want attached exits.
Place the order. It appears as a line on the chart and as an entry in Order History.
Take profit and stop loss
After a buy fills, DEKXDIS creates the attached exits using the tokens received. The take-profit order goes to the solver; the stop loss is monitored in the app.
When both are set, they form an OCO pair: once one fills, DEKXDIS cancels the other. Keep the app open and connected for local stop monitoring, creation of attached exits, and OCO cancellation.
Click an order line to cancel it, or use Cancel in Order History. Cancelling one linked OCO leg also cancels its connected active legs.
A limit buy with optional take profit and stop loss. Example prices.
Follow your orders
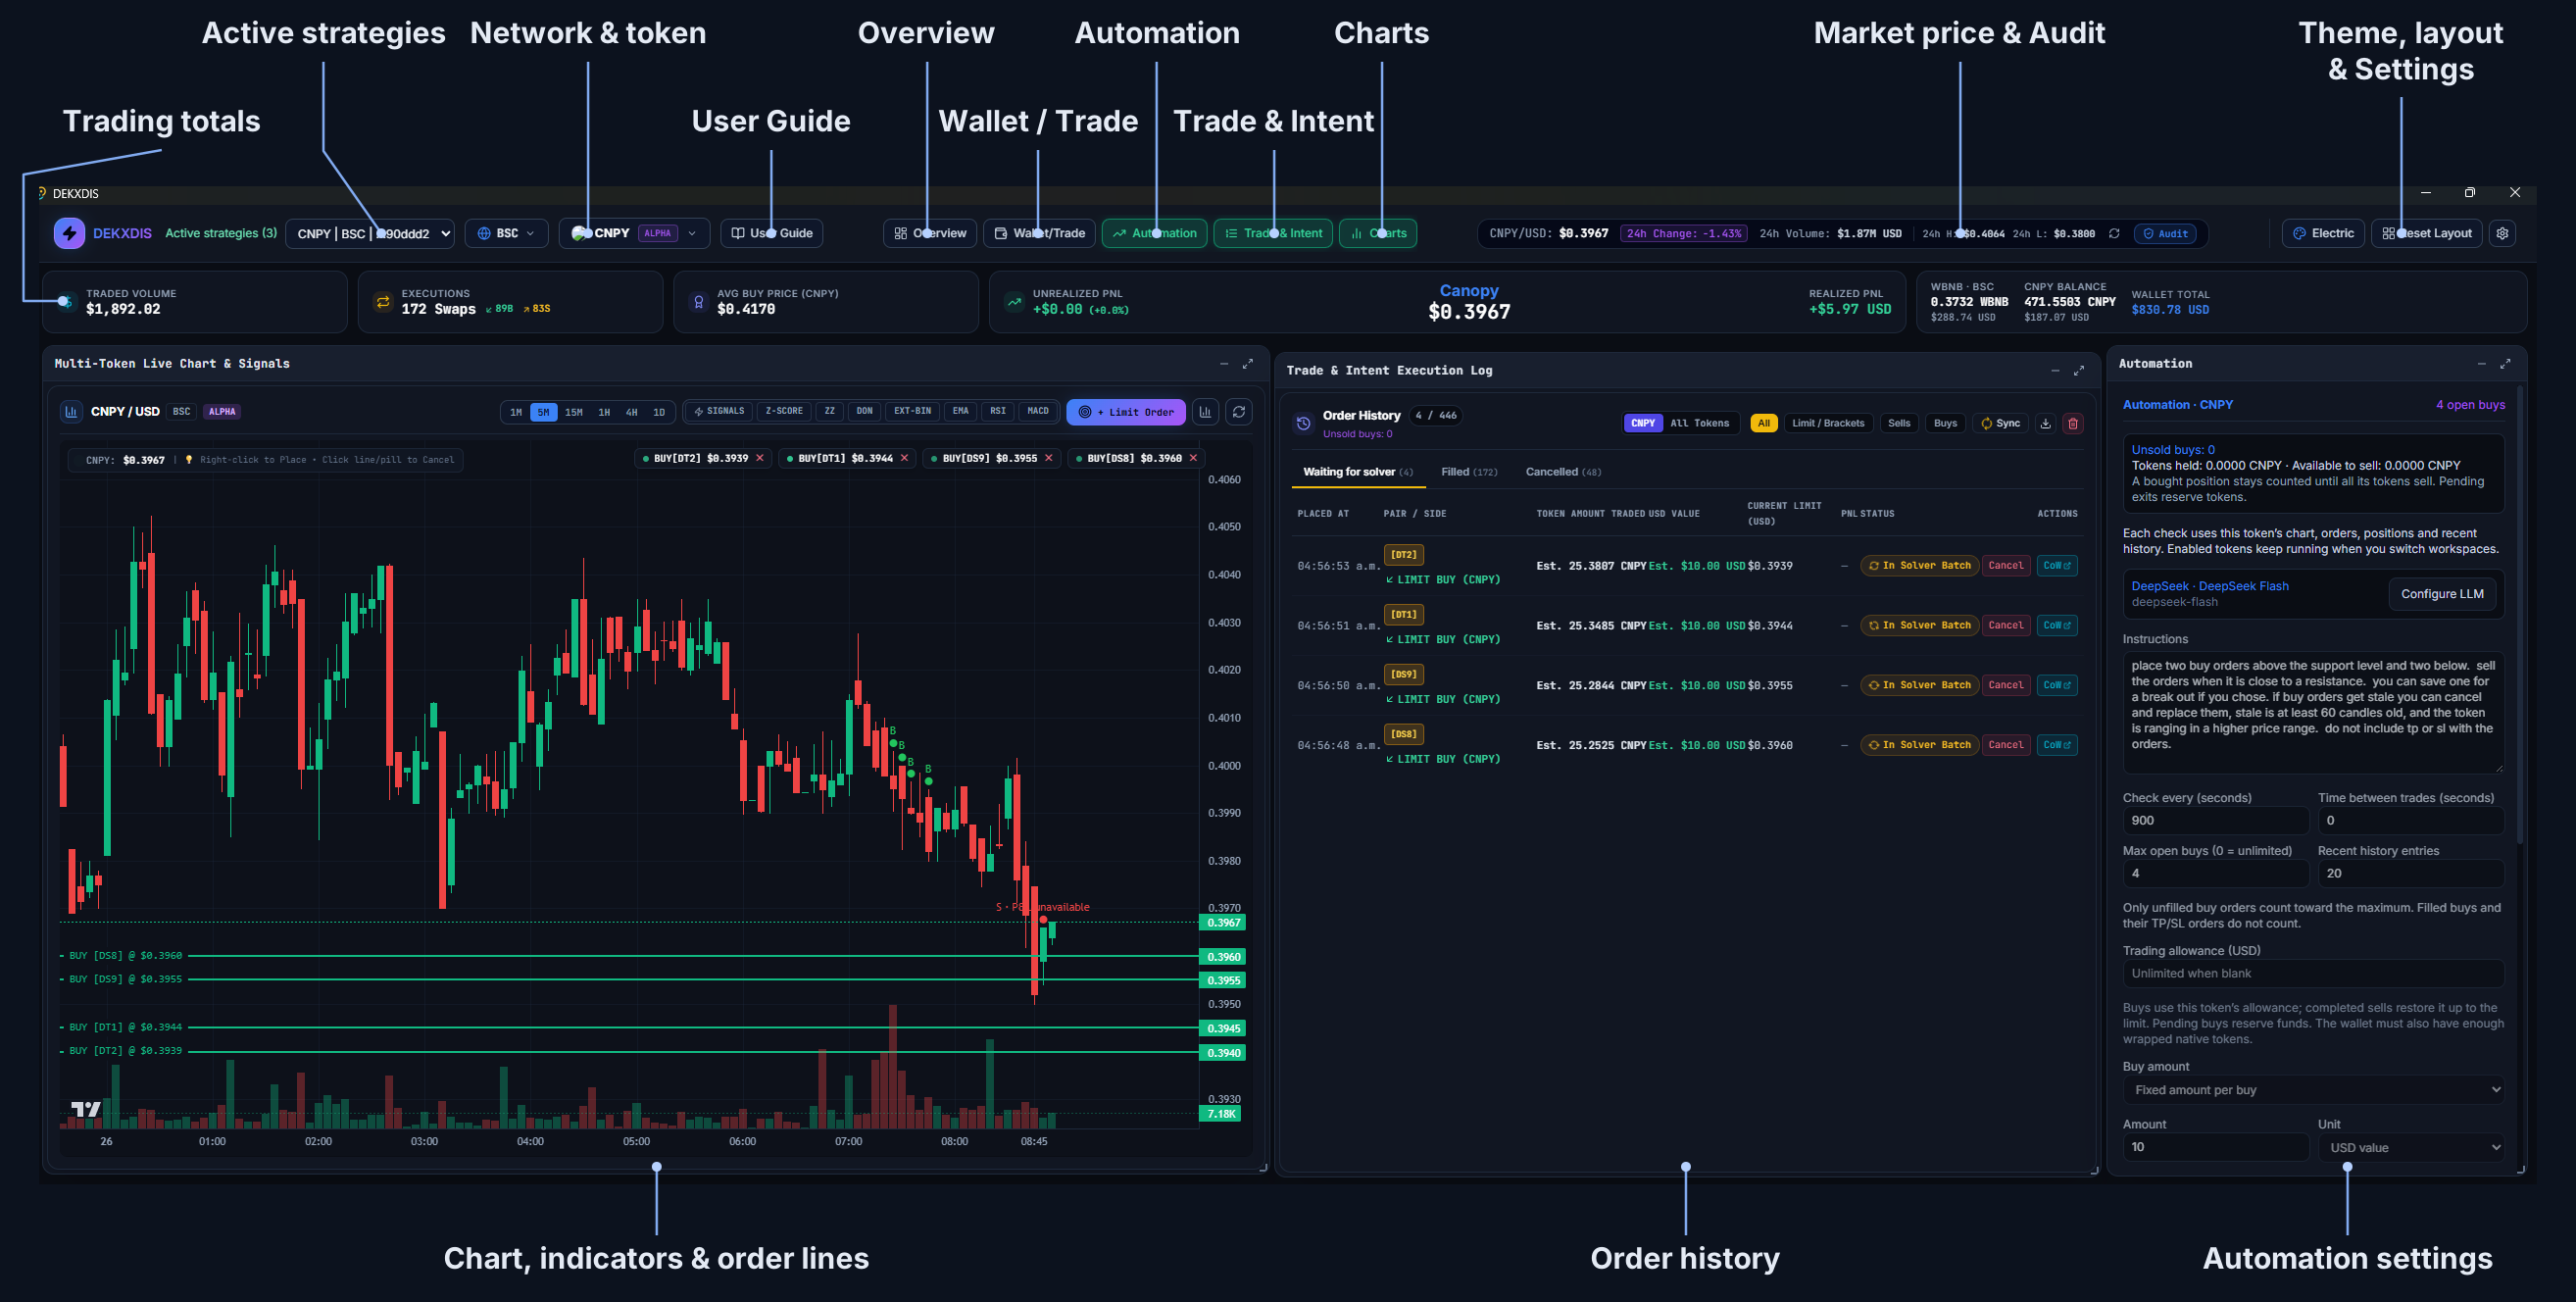
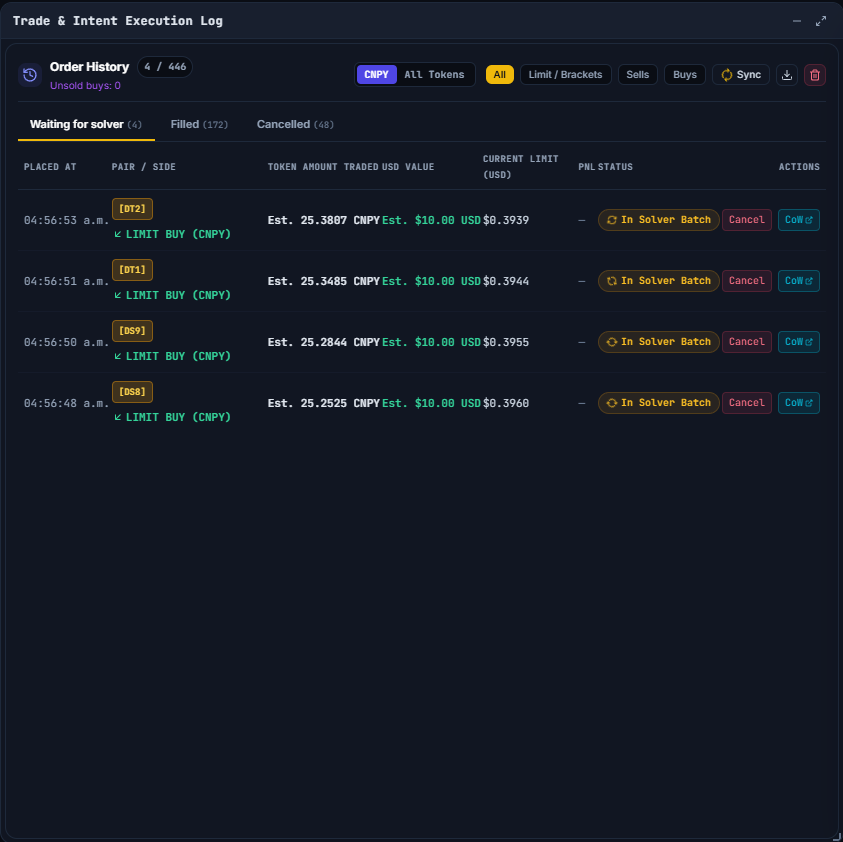
Open Trade & Intent to view Order History. Waiting for solver contains open orders, Filled shows completed trades, and Cancelled contains cancelled orders.
Order History shows each order’s amount, target price, status, and available actions.
Control
What it does
Selected token / All Tokens
Show this token’s orders or the active wallet’s orders across tokens and networks.
All · Limit / Brackets · Sells · Buys
Narrow the list to the order types or side you want to see.
Sync
Refresh order status.
Cancel
Cancel an open order.
CoW ↗
Open the order on CoW’s explorer.
Download / trash icons
Export order history as CSV, or clear completed records from the visible list.
Read the trading totals
The row above the panels shows Traded volume, completed Executions, Average buy price, and the selected token’s price. Unrealized PnL tracks the tokens still held; Realized PnL records profit or loss from completed linked sales. The wallet card at the right shows wrapped-token and selected-token balances, plus the wallet’s total value on the selected network.
USD makes amounts and results easy to compare. Trades exchange actual token quantities, and filled orders show the confirmed amounts. Unsold buys counts bought positions with tokens still held; a partial sale leaves a position counted until its remaining tokens sell.
04 / Automation
Set up automated trading
Automation reads the selected token’s chart, balances, open orders, bought positions, and recent trades. It uses your instructions to decide when to buy, sell, wait, or replace an order. Each wallet, network, and token has its own settings.
Connect an LLM
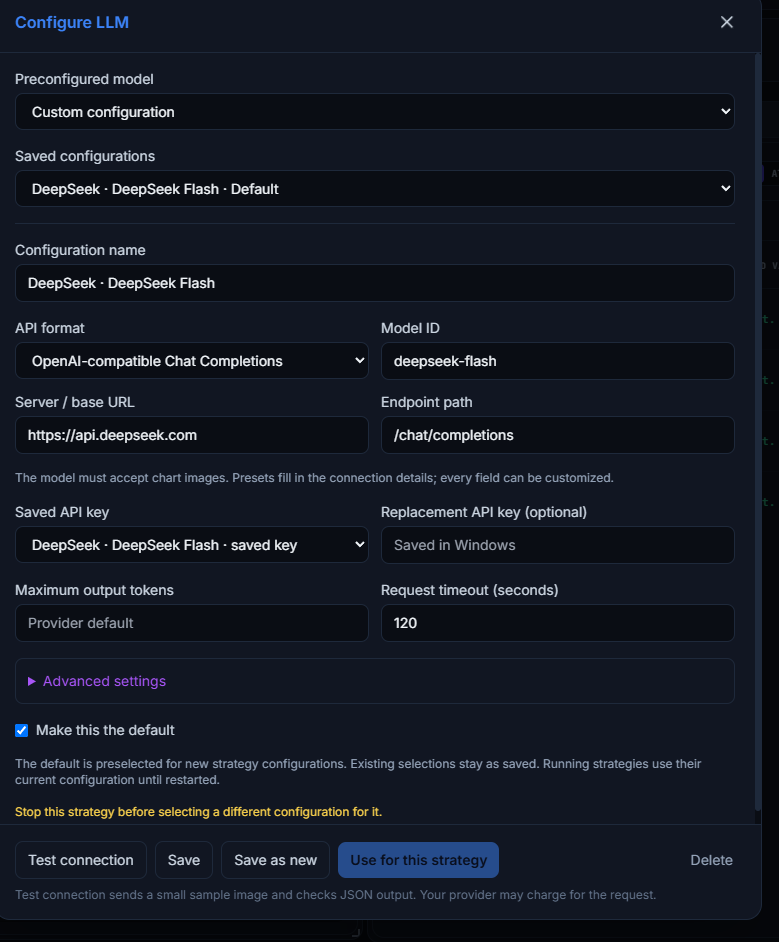
Open Automation in the top bar, then select Configure LLM. Choose a model that accepts chart images and returns structured responses.
Select a Preconfigured model to fill in its connection details, or choose Custom configuration and use the details from your provider.
Give it a Configuration name. Check the API format, Model ID, Server / base URL, and Endpoint path.
Select a Saved API key, or enter a key in Replacement API key. Saved keys are protected by Windows.
Select Test connection. This sends a small sample image and checks the response format; your provider may charge for the request.
Select Use for this strategy to save the configuration and assign it to this token’s automation.
Save stores your changes. Save as new keeps a separate copy. Make this the default preselects the configuration for new strategies; existing selections stay as saved.
Stop a running strategy before changing its configuration. Start it again to use the updated settings.
Configure LLM. The saved-key label is visible; the API key remains hidden.
LLM fields and advanced settings
API format
Choose the format used by the provider: OpenAI Responses, OpenAI-compatible Chat Completions, Anthropic Messages, or Google Gemini.
Model ID, server, and endpoint
Use the provider’s API model identifier, base URL, and request path. These are the API connection details, rather than the address of its chat website.
Maximum output tokens
Set a response-length limit, or leave it blank for the provider default.
Request timeout
How long DEKXDIS waits for a model response, in seconds.
Advanced settings
Set the provider’s authentication method, temperature, reasoning effort or thinking budget, API version, and token-limit parameter where applicable. Custom headers and additional request parameters accept JSON objects. Use the options supported by your selected model.
Delete
Remove an unused saved configuration. Choose another configuration for any strategies assigned to it first.
Write instructions and choose the settings
In Instructions, describe when you want to enter a trade, when to sell, when to wait, and when an open order should be cancelled or moved. Include any take-profit or stop-loss rules you want to use.
Check every (seconds)
The pause after one check finishes before the next begins.
Time between trades (seconds)
The minimum gap between new buys or sells. Zero removes the delay.
Max open buys
Limits unfilled buy orders. Zero means unlimited. Filled positions and their exits do not count toward this limit.
Recent history entries
The number of recent trade records included with each check.
Trading allowance (USD)
The amount this token’s automation may use for buys. Pending buys reserve funds; completed sells restore the allowance up to its limit. Leave it blank for unlimited, or enter zero to prevent new buys. The wallet also needs enough wrapped native tokens.
Buy amount
Choose a fixed amount in USD or token units, or let the model size each buy from your instructions.
Sells use the remaining available tokens from the bought position. The buy amount does not limit the value of a later sale.
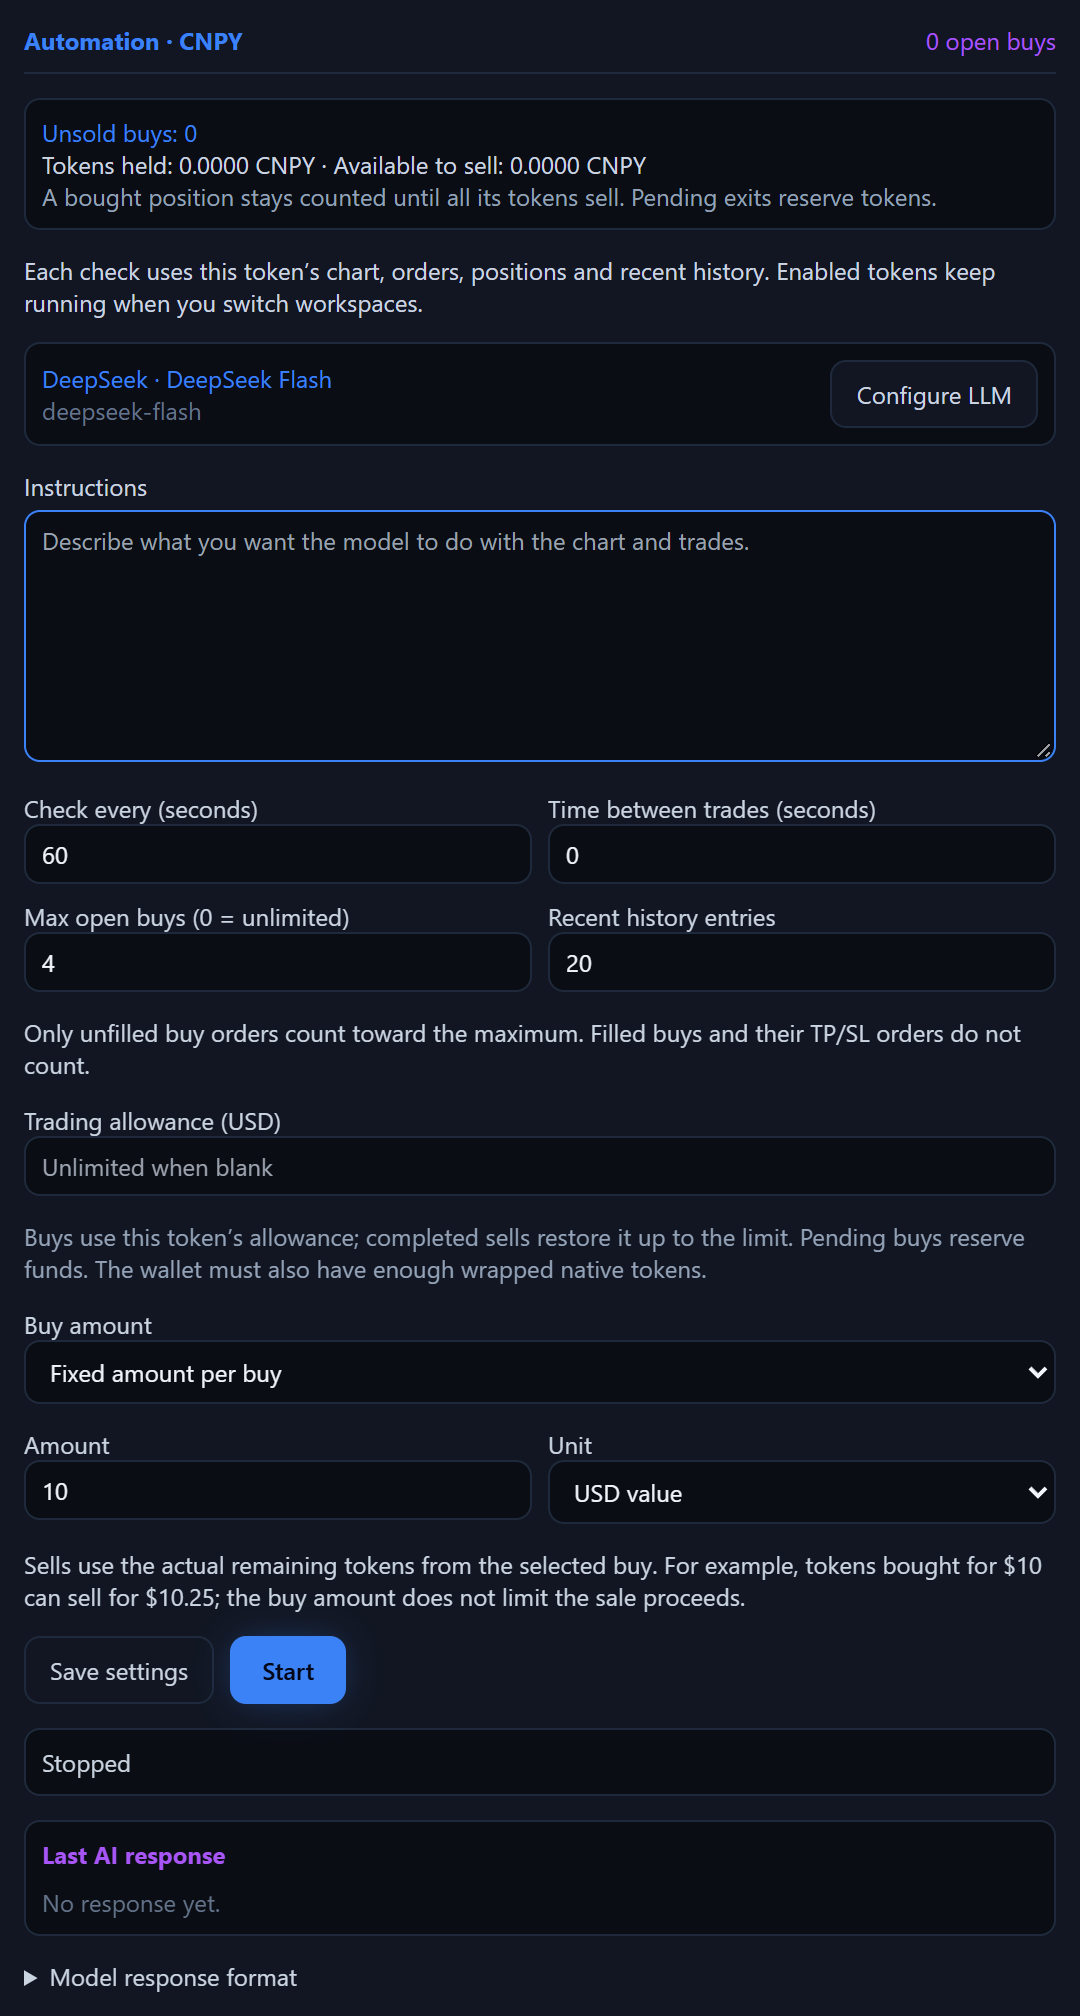
The Automation form before a strategy is started.
Start and follow a strategy
Select Save settings to keep your choices, or Start to save and begin. The status beneath the buttons shows the latest check and the next scheduled check. Read the model’s latest reply under Last AI response; Model response format shows the format used by the app.
Enabled tokens keep running when you switch workspaces. Use Active strategies in the top bar to return to one. Stop ends new automation decisions; existing orders remain in Order History for you to manage. After restarting DEKXDIS, start the strategies you want to run.
The trading allowance includes recorded manual trades for the same wallet, network, and token. Clearing visible history does not reset the allowance.
Use an LLM to help write your instructions
Copy this brief into your LLM and add your trading rules. Paste the finished instructions into the Automation form.
Help me turn my own trading rules into plain-language instructions for DEKXDIS automation. Ask about missing or conflicting rules before writing the final prompt. Do not invent a strategy, risk level, thresholds or settings for me.
Each check receives a fresh chart image with its timeframe and latest candle, wallet balances, open orders, bought positions, recent trade history, settings and remaining trading allowance for one wallet/network/token. Previous AI responses are not passed back. Use only supplied evidence; do not assume access to news, other timeframes, hidden indicators or a full numerical candle history. Unavailable values are not zero.
Supported actions are limit buys, sells of bought positions, cancellation and replacement of open orders, optional TP/SL and waiting. This is spot trading, not short selling. Prices are USD display values; settlement uses actual token quantities. A sell identifies a bought position using its entry ID and sells its entire available remainder. Tokens reserved for an existing exit cannot be sold again. A pending sell is not a completed sale.
Reposition an order by cancelling its exact open-order ID and requesting a replacement. Cancellations run first; if cancellation fails or the order has filled, replacements from that response are not placed. Cancelling one OCO leg also cancels its connected active legs. Filled buys must be managed as positions, not cancelled. Manual trades are included in the supplied data, so ask whether my rules should manage them.
Settings constrain the prompt: the check interval is the wait after each check finishes, not a candle-close trigger. Time between trades applies to both buys and sells and can prevent several orders being placed in one check. Max open buys limits unfilled buys only; zero means unlimited. It does not cap held positions. Fixed buy amount overrides model sizing; model-chosen sizing must follow my rules. Recent history entries controls how much recent trade history is supplied. Trading allowance limits buys, reserves pending buy funds and is replenished by completed sales; blank means unlimited and zero prevents new buys. Wallet funds must also be available.
Ask me to specify entry, exit, hold/wait, cancellation and replacement conditions; sizing and held-position limits; TP/SL choices; treatment of manual trades; and what to do when evidence is missing. Distinguish confirmed fills from pending orders and completed candles from the current candle. Prompt-only rules depend on the model following them; they do not add application-enforced limits or guarantee fills.
Return only the final plain-language instructions once my choices are clear. DEKXDIS appends its required JSON response format automatically; do not replace it or invent additional actions.
My trading rules: [add my rules here] My chart timeframe and automation settings: [add my choices here]
05 / Managing your wallet
Assets, transfers, and saved wallets
Open Overview to work with assets across all five networks. Sync refreshes the balances. The total at the top combines the active wallet’s assets across networks; Overview’s realized PnL combines recorded linked sales across wallets, tokens, and networks.
Swap assets or transfer between networks
In Asset Overview, select the asset you want to spend, then select the asset you want to receive. The first selection is the source; the second is the destination.
Choose both assets on the same network for a swap, or choose the destination on another supported network for a cross-network transfer. Enter the USD amount and review the route, estimated amount to receive, and fees before confirming. Progress appears in Asset Overview, with details in the System Log.
For a native-token conversion, follow Prepare funds for trading. For other same-network swaps, use the wrapped form of a native token.
Send to another wallet
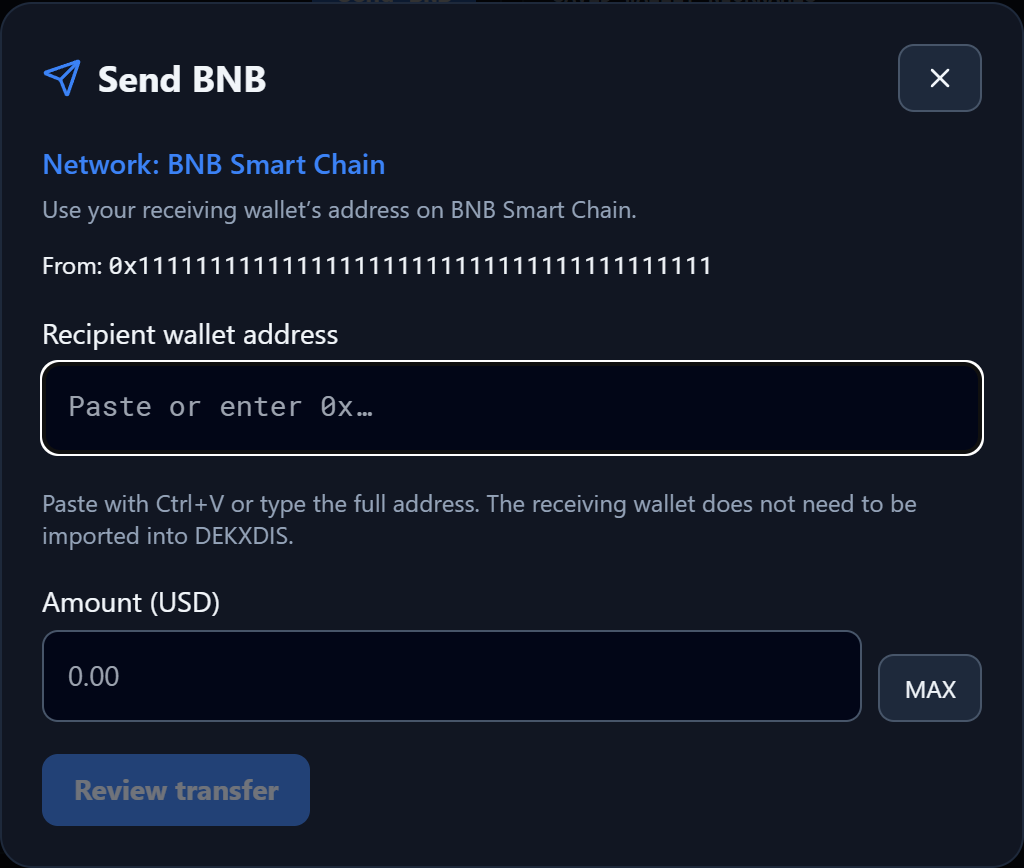
In Asset Overview, select the asset to send, then select Send.
Enter the receiving wallet’s address on the network shown in the form.
Enter the amount in USD, or select MAX.
Select Review transfer to see the token amount and recipient.
Select Confirm and send. Use View transaction to open the transfer in the network explorer.
The receiving wallet does not need to be imported into DEKXDIS.
Asset Overview → select an asset → Send.
Name and switch wallets
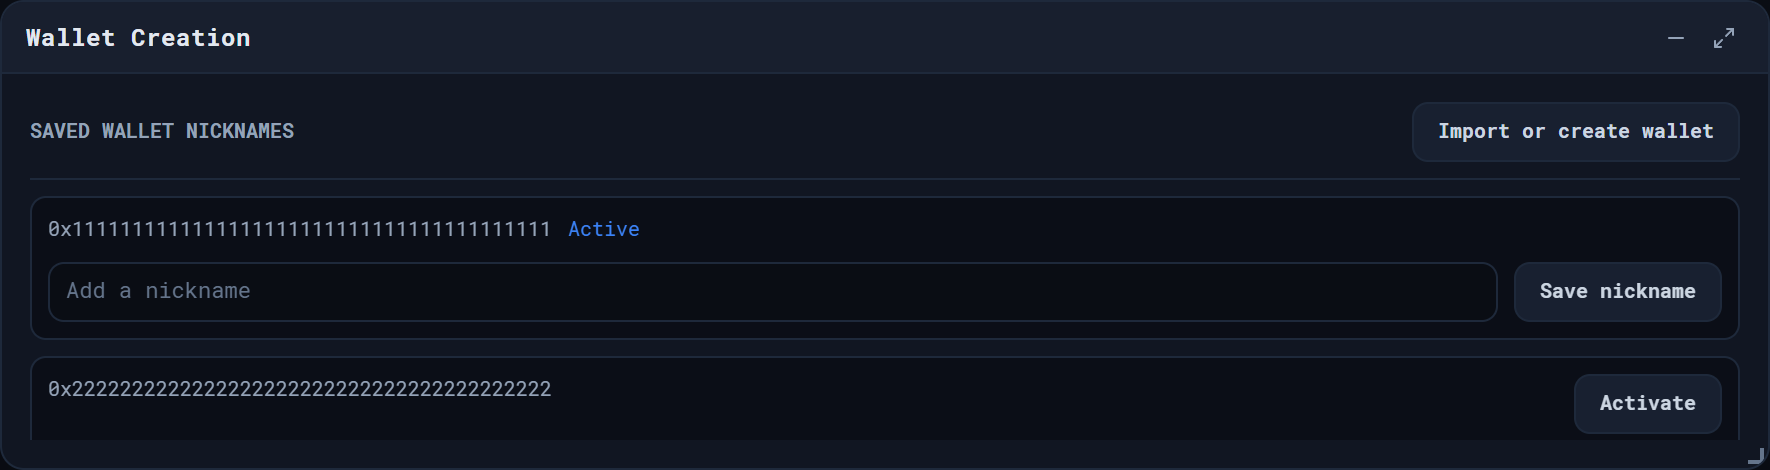
In Wallet Creation, enter a label in Add a nickname, then select Save nickname. Active marks the wallet currently in use. Select Activate beside another saved wallet to switch to it. To add another wallet, use the create or import steps.
Nicknames help identify saved wallets. The Active label shows which one is selected.
Read the System Log
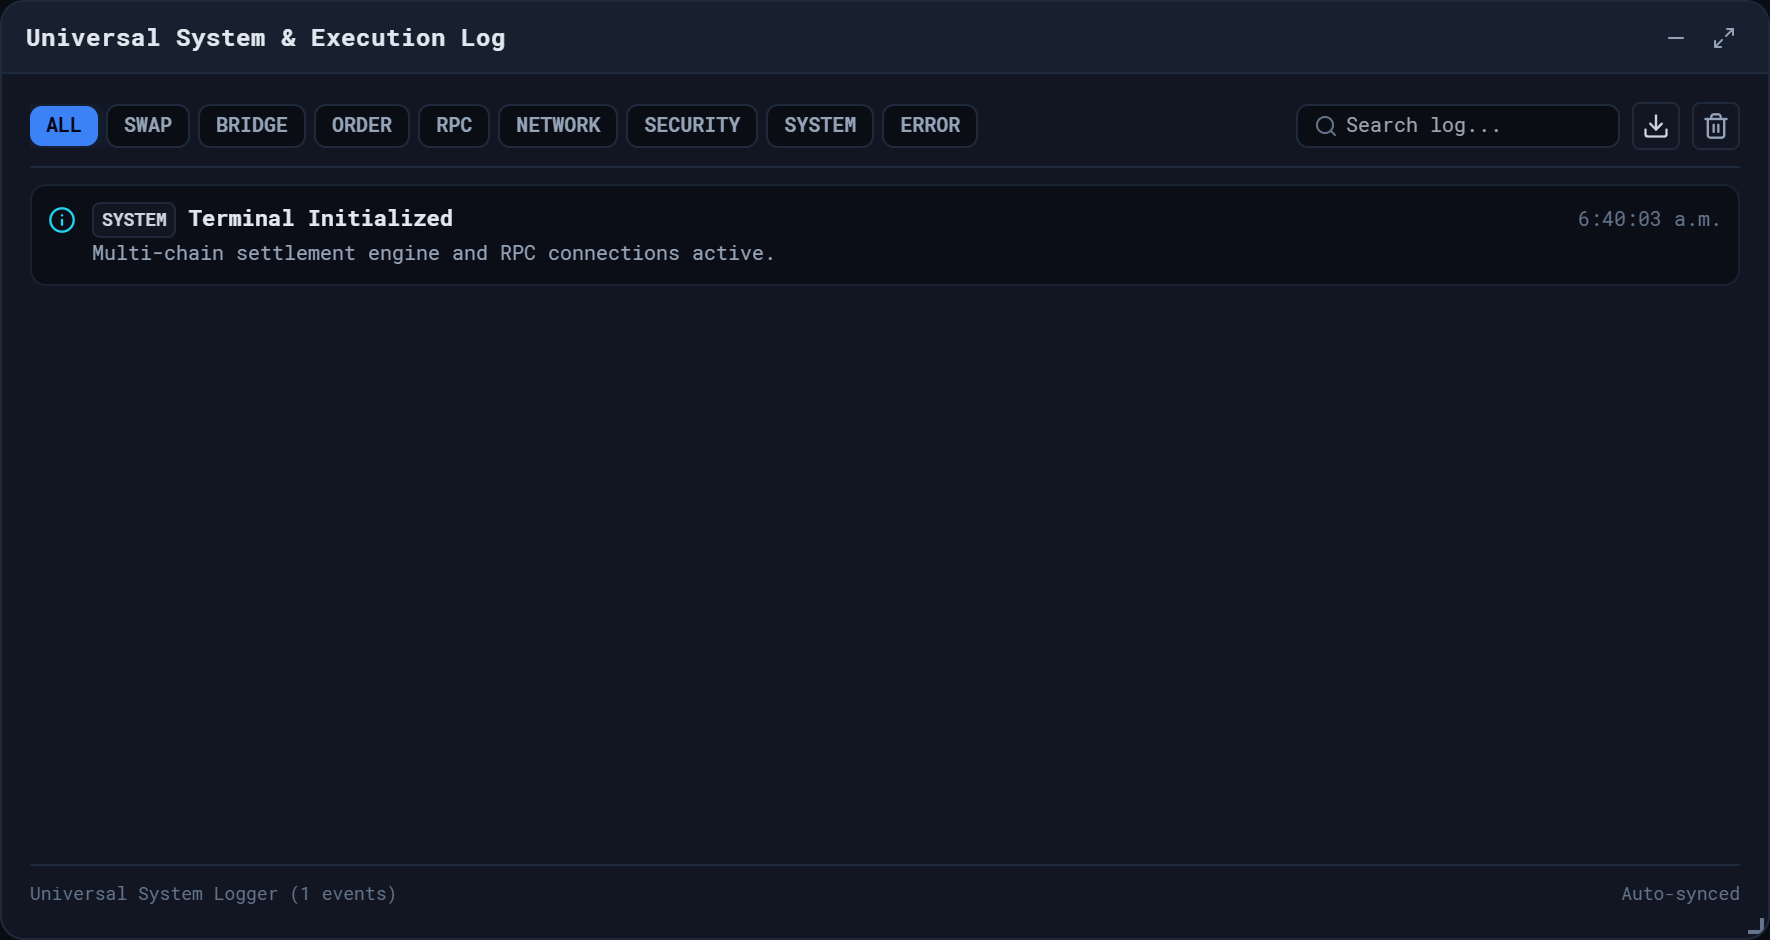
The Universal System & Execution Log on Overview records swaps, transfers, orders, and app activity. Select a category to filter the entries, or use Search log…. The download icon exports a JSON copy of the log; the trash icon clears its displayed entries.
Filters, search, and log tools stay together above the entries.
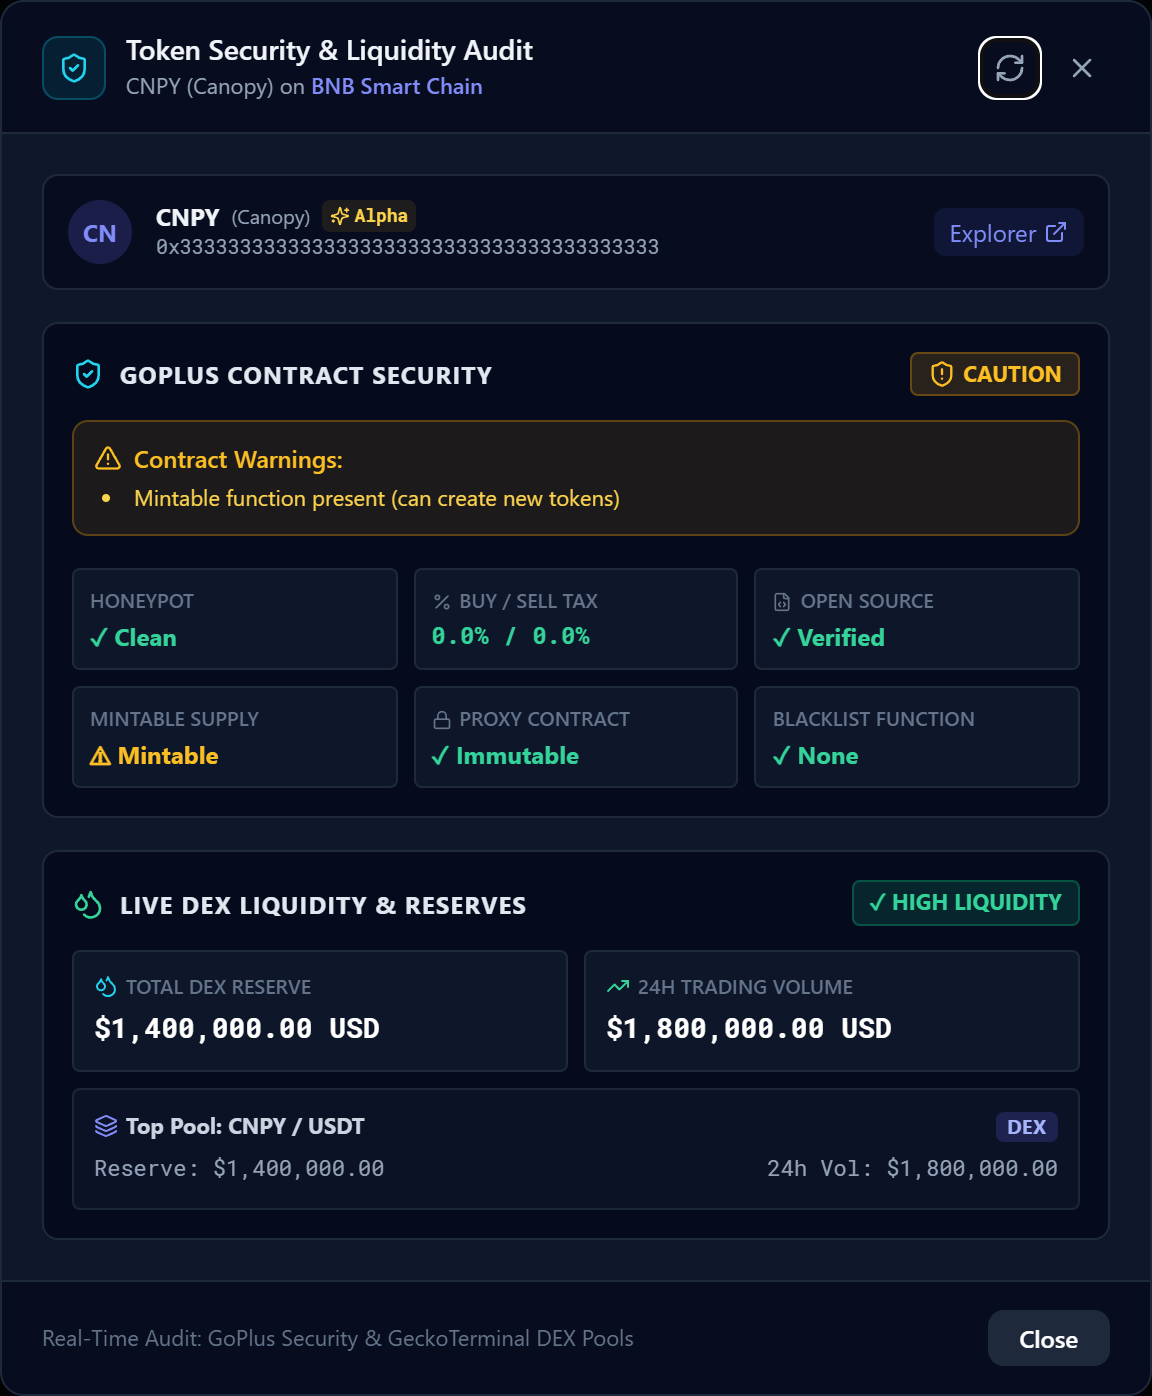
Check a token
Select Audit beside the token’s market price in the top bar. The report shows available contract checks, buy and sell taxes, and liquidity information.
Use the refresh button to run the checks again. Explorer and pool links open more detail in your browser. A missing check is shown as unknown; the report is information to review, rather than a guarantee.
Top bar → Audit. Example contract checks and liquidity figures.
06 / Your workspace
Layout, settings, and updates
Arrange the panels
Drag a panel by its title bar to move it, or drag its lower corner to resize it. Use the title-bar buttons to minimize or maximize it. The Charts, Trade & Intent, and Automation buttons in the top bar show or hide those panels. Reset Layout restores the page’s default arrangement.
Select the theme button in the top-right corner to choose the app’s colors. The screenshot at the start of this guide uses Electric.
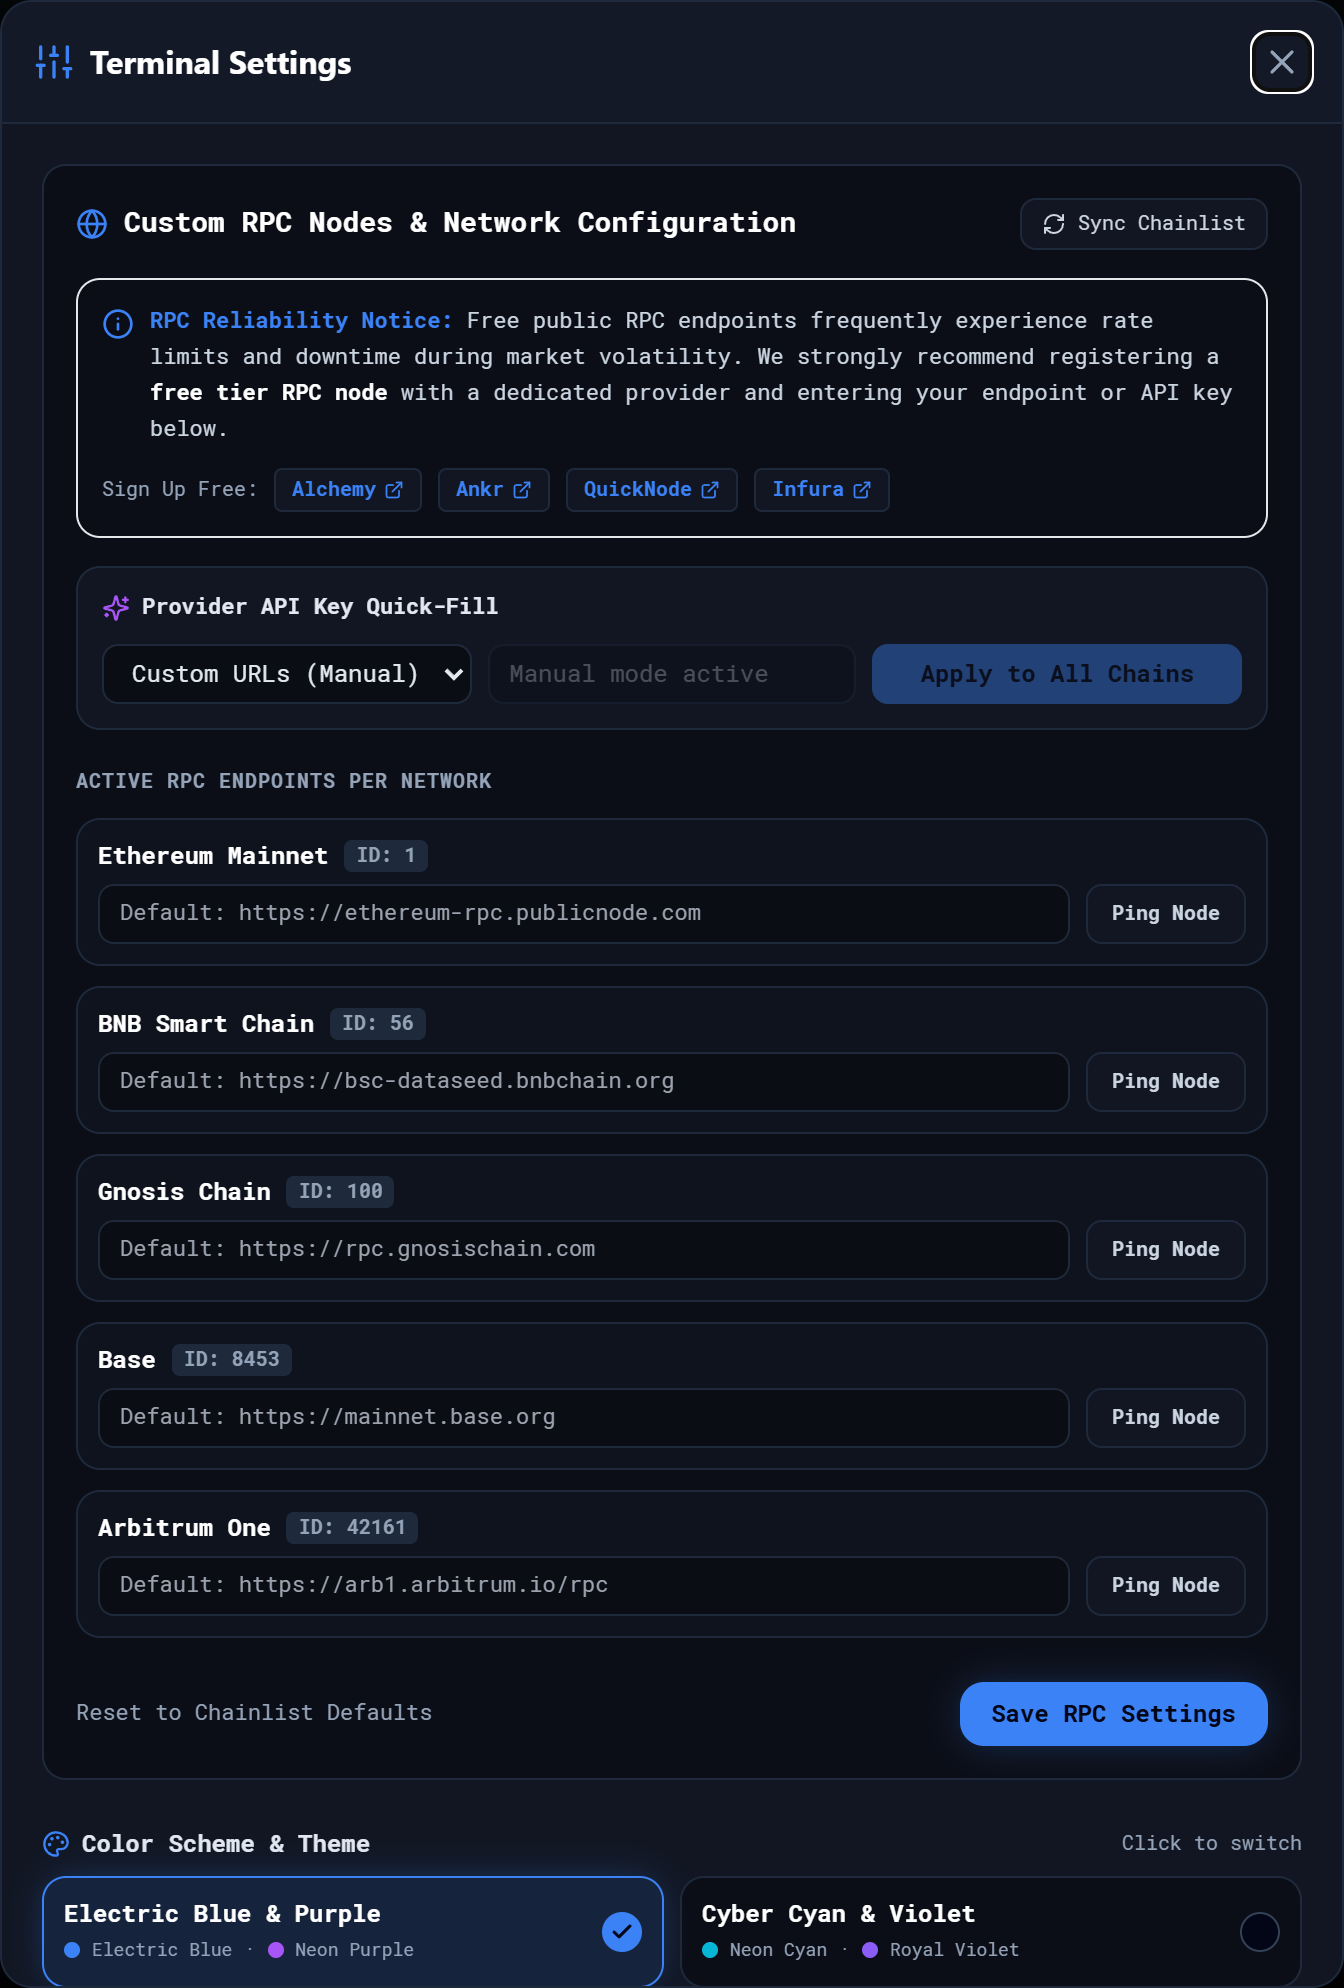
Open Terminal Settings
Select the gear in the top-right corner.
Network connections
The default public connections are ready to use. To use your own provider, enter its network URLs or choose a supported provider and supply the requested details. Ping Node tests a connection; Save RPC Settings saves it. Sync Chainlist refreshes the public list. Apply to All Chains fills the supported endpoints from a provider key; Reset to Chainlist Defaults restores the public connections.
Start with Windows and restart after a crash
Launches DEKXDIS when you sign in to Windows and reopens it after an unexpected exit. Keep the executable in a stable folder.
Scroll within Settings for the theme controls. Select Done to close it.
Top-right gear → Terminal Settings. Scroll within the dialog for the remaining settings.
Close or update DEKXDIS
Closing the main window opens Close DEKXDIS?. Choose Keep DEKXDIS running to return, or Close DEKXDIS to exit. Minimizing leaves the app running.
The app checks for updates at startup and every 24 hours. When Update available on GitHub appears in the top bar, select it to open the official download page. Download the new executable, or build the new source. DEKXDIS does not replace itself automatically.
Your saved wallet and app data remain on the computer and reopen under the same Windows account.
07 / How fees work
Set Your Price. Capture the Surplus. Pay 0% in Flat DEKXDIS Fees.
How does this sound to you: sell your tokens for the price you want without losing money to slippage and fees? Good? Then read on.
Through our integration with CoW Protocol, we utilize an advanced network of independent "solvers" to match your orders. Instead of relying on a single liquidity pool, solvers tap into a vast web of secure sources—including on-chain pools, major exchanges, and private peer-to-peer sale orders—to find you the best possible rate.
The best part? The solvers only get paid if they earn you money by generating a surplus on your order. This performance-driven structure guarantees that everyone's incentives are perfectly aligned.
How it Works (The $1,000 Example)
Imagine you want to sell Token A. You place an order intent stating you want to receive exactly $1,000 USD for your tokens.
The Solver Auction: Your order goes out to a competitive batch auction where solvers bid to find you the absolute highest return. Solver 1 finds a route for $1,010, Solver 2 finds one for $1,020... Sold!
The Surplus: They just secured an execution price that is $20.00 more than you were originally asking for. This $20.00 is your trade surplus.
The Clear Payout Breakdown:
CoW Protocol Fee: CoW Protocol charges 50% of the surplus (capped at 0.98% of total trade volume), plus a 0.02% volume fee for standard assets. Together, these amount to approximately $10.20 in this example.
Dekxdis Fee: Our platform takes a 25% performance cut of the surplus remaining after CoW Protocol fees (capped at 1% of trade volume), which amounts to approximately $2.45.
Your Share: You keep the remaining surplus after those capped fees. In this scenario, you walk away with approximately $7.35 extra, receiving $1,007.35 after rounding.
CoW Protocol’s 0.02% volume fee for standard assets is included in the example totals above.
You received exactly what you wanted for your tokens, all platform and protocol infrastructure costs were fully covered, and you walked away with extra money in your wallet. It is a true win-win for everyone.
Why This Beats Traditional Exchanges
No Artificial Markups: Say goodbye to hidden fees, artificial spreads, and slippage nonsense.
Minimal Cost for Base Execution: If the market doesn't allow solvers to find a surplus, CoW Protocol still charges its 0.02% volume fee for standard assets—about $0.20 on a $1,000 trade. There is no surplus-based payout, and Dekxdis doesn't get anything. This has been rare in our own trading: only two out of more than 1,000 trades did not generate a surplus.
No Risk on Cancellations: If you decide to cancel your order before it fills, you pay nothing.
Outperforming Centralized Exchanges (CEXs): Traditional centralized platforms charge flat fees anywhere from 0.1% up to 2% on your total order size. On a $1,000 trade, a standard exchange might swallow your funds in fees, leaving you with only $980 for tokens you wanted $1,000 for. In this example, on our platform you leave with $1,007.35.
Install Rust with its Windows MSVC toolchain, and the WebView2 Runtime if it is not already installed.
Clone the DEKXDIS repository, or use Code → Download ZIP and extract it.
Open PowerShell in the project folder and run:
npm ci
npm run tauri:build
When the build finishes, open:
src-tauri\target\release\DEKXDIS.exe
The build creates a standalone executable. Use a separate source folder if you want to keep another build of DEKXDIS running while you compile.
Legal disclaimer
DEKXDIS and this guide are provided “as is” and “as available,” without warranties of any kind, to the fullest extent permitted by law. Use is entirely at your own risk. Nothing in DEKXDIS or this guide is financial, investment, tax, or legal advice.
You are responsible for your trading decisions, transactions, wallet backups, keys, device security, and compliance with applicable laws. Digital assets can lose all of their value. Transactions may be irreversible, and software, networks, exchanges, solvers, bridges, and other third-party services may fail.
To the fullest extent permitted by law, DEKXDIS’s developers, contributors, and operators disclaim all liability for any claims, losses, damages, costs, or expenses arising from the use of, or inability to use, DEKXDIS or this guide, including loss of funds, tokens, keys, data, profits, or access, regardless of cause or legal theory. No statement here excludes a right or liability that applicable law does not allow to be excluded.